Understand the key components of a case and how they work together.
Case structure
The case layout uses a visual hierarchy. When you open a case, start at the top left to check the case status and key details, then work your way down and right to review content and access tools.
The topics of this article correspond to each section in the diagram below.
Navigation path
Controls
Title, properties
Table of contents
Content
Sidebar

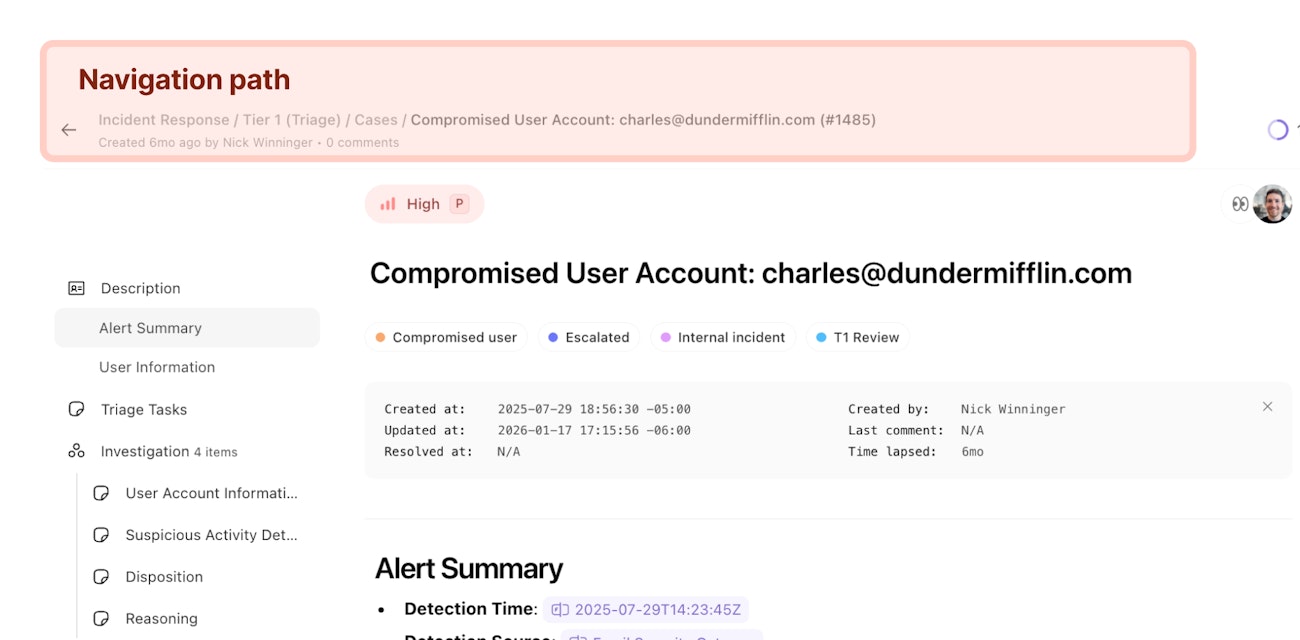
Navigation path
When you open a case, you'll see where it lives in your team structure.
Cases live within a team or in a Team's case groups. The navigation path shows breadcrumbs to help you understand where the case is in the hierarchy.
Team > Case group > "Cases" > Case name & IDThe navigation path also displays a hint with a few key details about the case, specifically:
Case ID
How long ago the case was created
Who created the case
Number of user comments
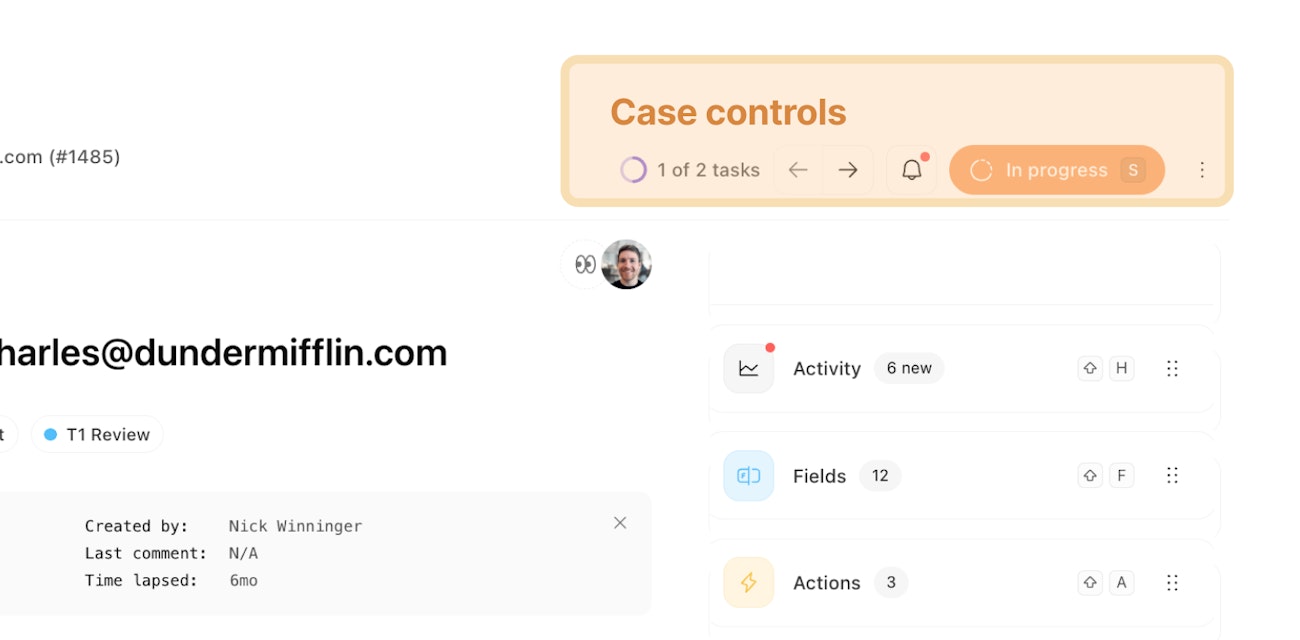
Controls
Next are controls for managing the case:
Number of case tasks remaining vs completed
Navigational arrows to advance to the previous or next case assigned to the current user
Notifications and configuration for subscriptions
Case status selection
Options & controls
Copy the direct link to the case
Subscribe/unsubscribe to the case
Export the case as a PDF
Delete the case
Hide/show the case sidebar
Toggle wrapping of code blocks
Collapse/expand all blocks
Title and properties
This section shows case details and metadata:
Severity of the case (Critical, High, Medium, Low, Info)
Subscribers to be notified of case changes (users are subscribed by opting-in via the control options or from being mentioned in a comment) as well as current viewers of the case
Assignee(s)
Case title
Tags
Info icon—click to view timing and activity metadata
Timing metadata:
Created at,updated at,resolved at,time lapsed since creationUser metadata:
Created by,last comment from

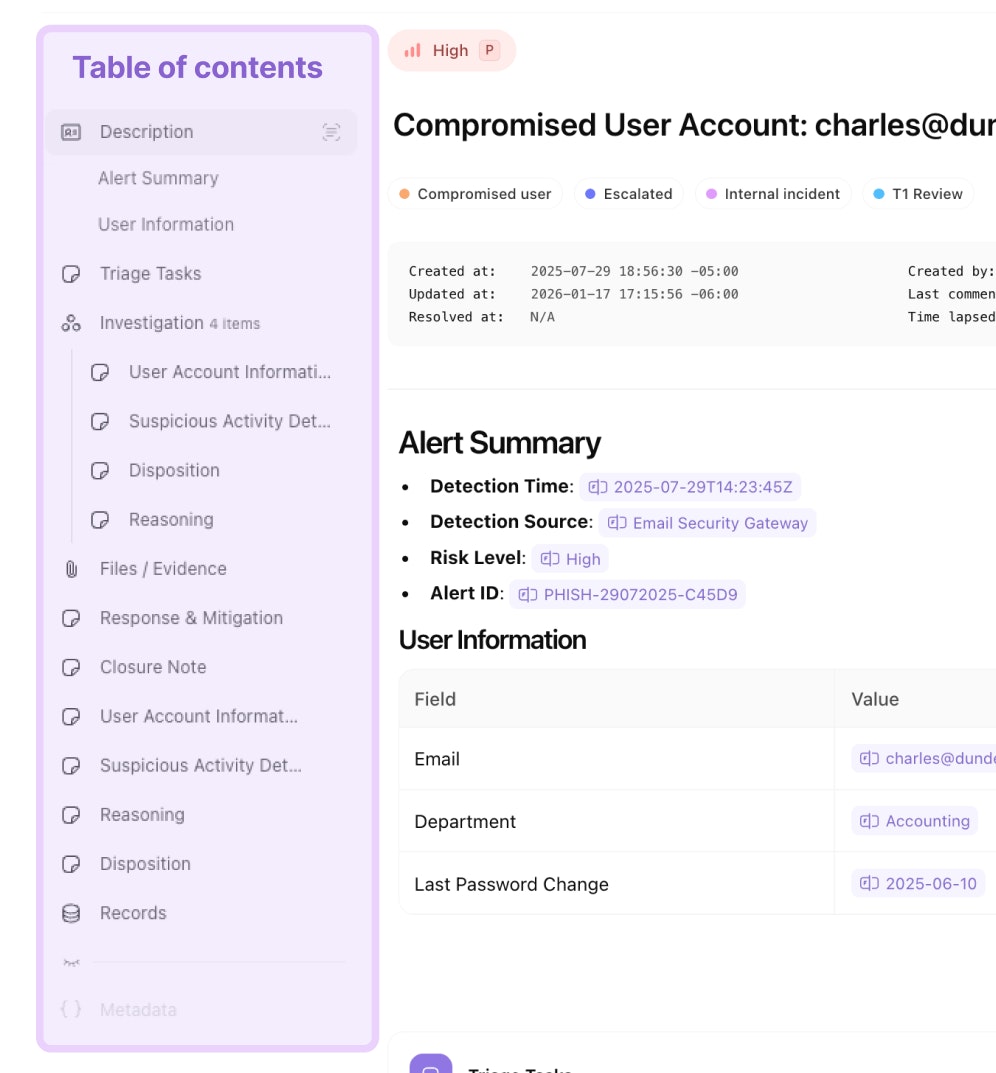
Table of contents
Navigate case contents using the table of contents. It showcases the case description and structure of case blocks.
Click to navigate to a section
Each entry is a header in the case description, a case block group, or a case block. Click any section to quickly scroll and display the description heading or case block.
Spotlight one or more sections
When hovering on a section in the table of contents, the spotlight icon will appear. Click this icon to hide all content except the target description header, case group, or case block.
Easily compare content between specific case sections by clicking more than one section's spotlight icon.
Reorder sections by dragging
Click and drag a case block to re-order it within the case structure. You can also drag the case block into and out of case groups. Headings and the description section cannot be moved - they are pinned to the top of the case table of contents.
Show and hide sections
Select Hide from the options menu within each case block to hide it from displaying in the case content. Clicking a hidden case block will display it's content similar to spotlighting unhidden sections.
Show and hide the table of contents sidebar
The table of contents is located in the left sidebar. This sidebar is shown by default but can be configured to a "peek" mode by clicking the Contents button at the top of the sidebar. This will temporarily hide the table of contents sidebar until you position your mouse near the left edge of a case. It will then peek out for interaction before hiding again.
Description and content
Build and view the core content of your case here.
Case content uses CommonMark formatting. When you type and format content, it's stored as markup. When you interact with APIs and stories, you can view and edit the raw markup.
The content area is broken up into two sections: Description and Case blocks. Every case has a description block. Case blocks are optional.
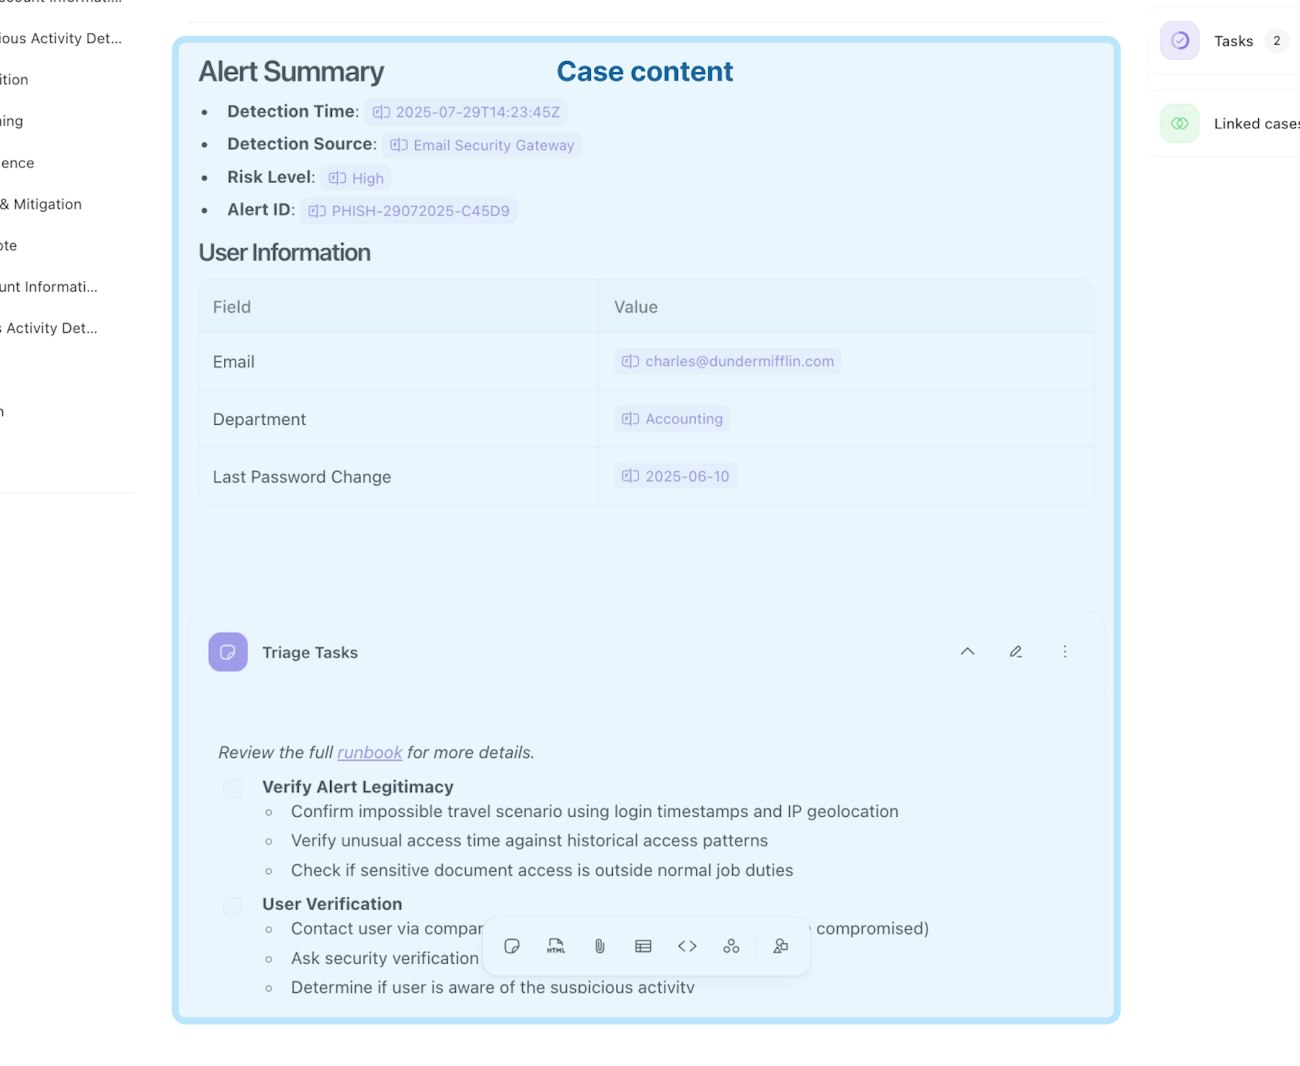
Description section
The description is the beginning of the case content and is followed by case blocks. It supports a large volume of text and the contents of the description are included in search results. You cannot re-order the description within the case structure or table of contents.
Case blocks and groups
Click each button in the toolbar at the bottom of the case to add content below the description section. Cases use a concept called "Blocks" to help structure and format your content. Each block can be added via the case toolbar at the bottom of the case below. Add blocks to the case, then add your content.
Blocks can be grouped together
You can re-arrange blocks or groups of blocks using the table of contents or options menu within a block
Blocks can be set to one of 8 pre-defined colors.
References & formatting
Use the
/shortcut to open the formatting menu. The formatting options support Headings, bullet lists, ordered lists, task lists, a code block, a quote, inserting an image via link, pasting an image, a table, or a callout.Use the
@shortcut to open the reference menu. The reference options support mentioning stories, users, pages, other cases, as well as blocks within the current case. You can also include shortcuts to case primitives like fields and case actions.
Record section
Create, attach, view, filter, search and remove records that have been linked to the case. This section is pinned to the bottom of the case.
Case toolbar
Case sidebar
The sidebar keeps essential tools and context within reach while you work. Customize it to fit your workflow by reordering sections and chosing which case tools are displayed.
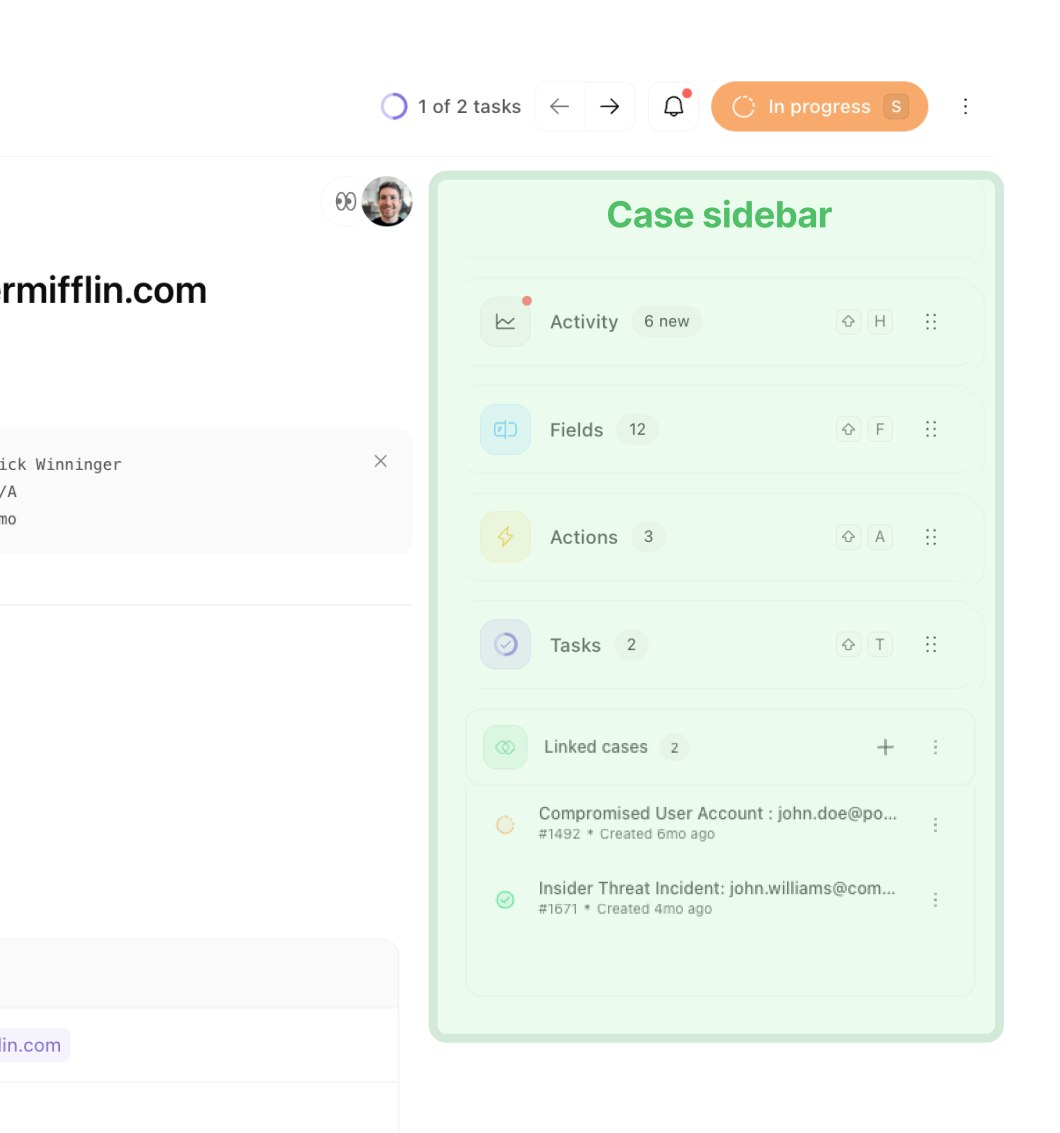
Interacting with the sidebar
Click each section header of the sidebar to show or hide the section's details. When a section is collapsed, you can then drag the section up and down to prioritize what's important to you.
🪄Tip
Configuring the sidebar
Sidebar customization is saved locally in your browser. Your section order and expand/collapse preferences persist across all cases, case groups, and teams.
The sidebar's configuration cannot be centrally managed.
💡Note
Resizing the sidebar
Adjust the sidebar width by dragging the divider between the case content and sidebar. The sidebar can expand up to half your window width.
Hide and show the sidebar
Use the case options menu in the top-right to hide or show the sidebar. Alternatively, use ⌘ + ] (Mac) or ctrl + ] (Windows) as a keyboard shortcut.