AWS
Introduction
Using Tines Stories to automate interaction with AWS services requires the use of an AWS credential. When a HTTP Request Action with an AWS mode credential runs, Tines Stories will authorize the request AWS using the Signature Version 4 Signing Process↗ and include the corresponding headers in the request.
Creating an AWS credential
Role-based access
AWS recommends using roles↗ for cross account access - e.g. to allow Tines Stories to access resources in your AWS account. To create a Role-based access AWS credential in Tines Stories, you'll also need to create and correctly configure a Role in your AWS account. The following three steps will get you up and running. For more information, see the AWS tutorial↗.
Role-based access is not available on self-hosted environments.
Step 1: Create your AWS Credential in Tines Stories
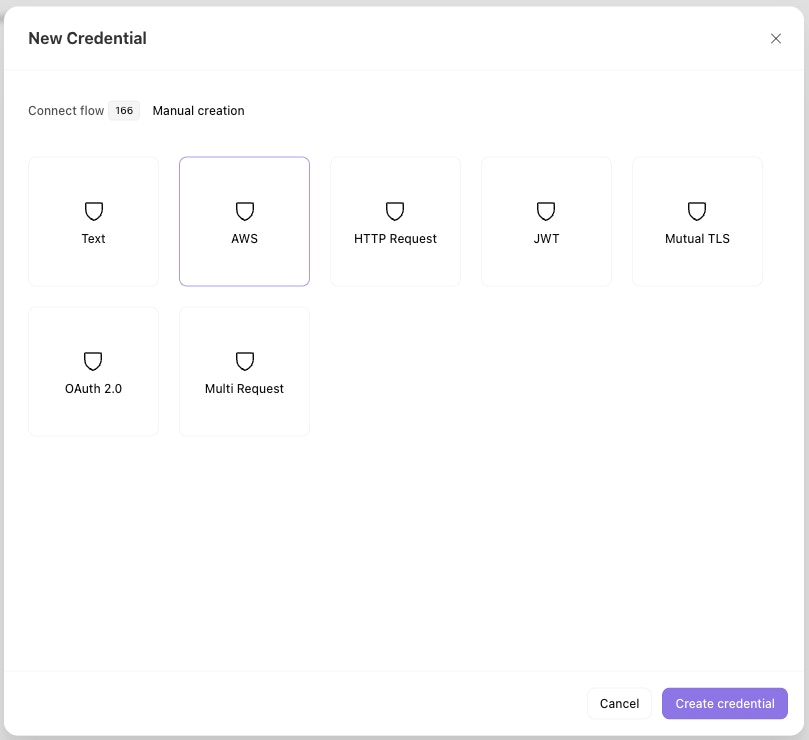
Create a new Credential in Tines Stories. Select "Manual creation" then select the "AWS" option.
Set the "Authentication type" to "Role-based access" and enter a name (and, optionally, a description).
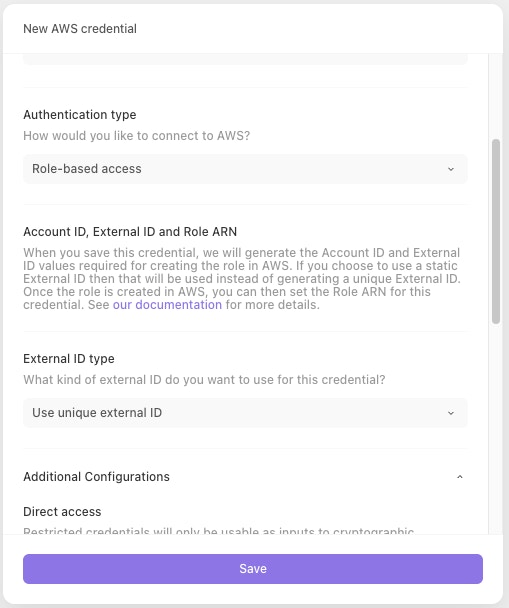
You can also choose whether to use a unique generated external ID or to use a team-scoped static external ID. If a team-scoped static external ID does not already exist then one will be generated.
External IDs are a layer of protection that only allows a Tines AWS credential with your uniquely generated External ID can access the role within your AWS account.
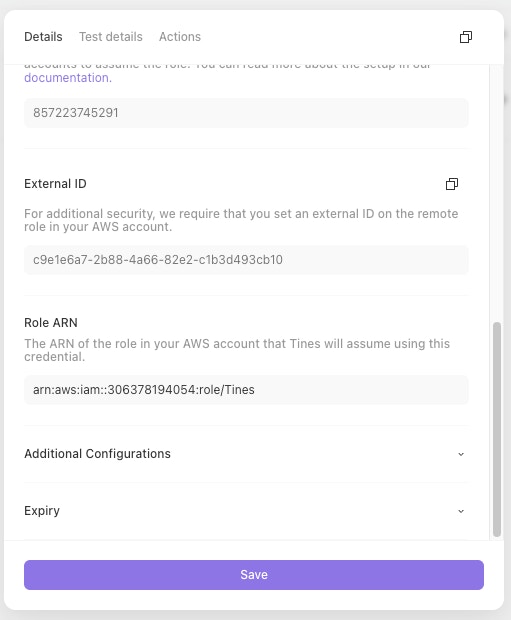
Once you click "Save credential", you'll be presented with an Account ID and External ID:
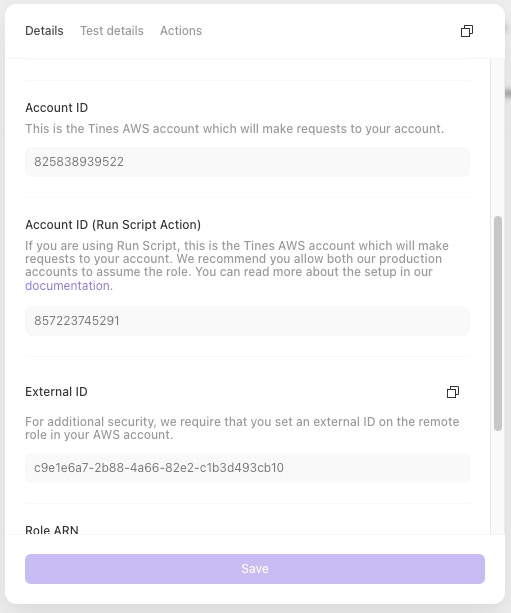
You'll need these values in the next step.
Step 2: Create your Role in AWS
From the Identity and Access Management (IAM) section of the AWS console, navigate to "Roles" and click on "Create role":
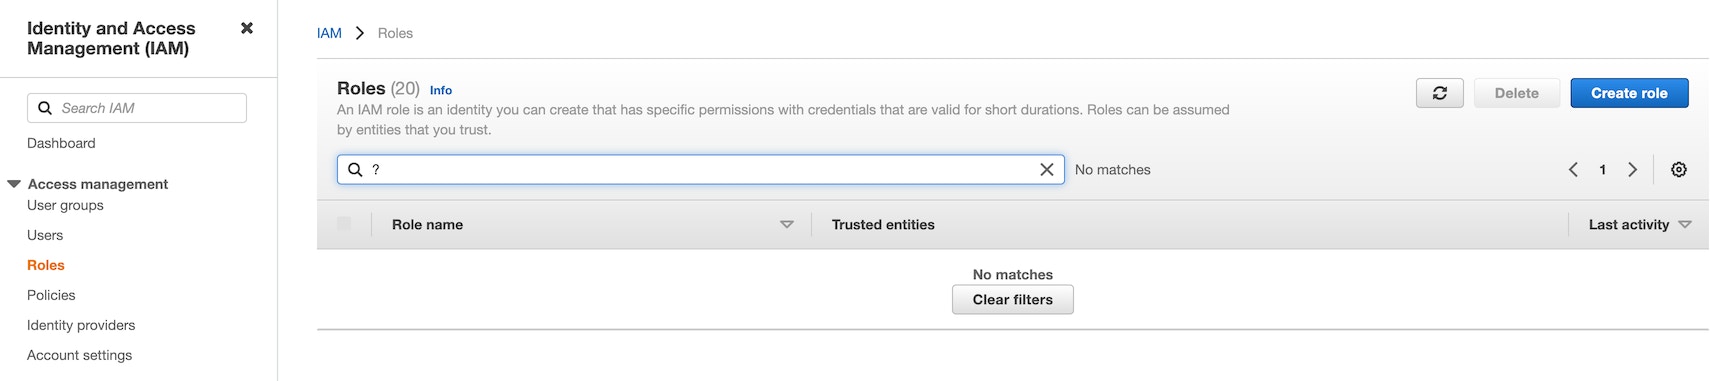
For "Trusted entity type", select "Custom Trust Policy" and copy-paste the following trust policy, giving the two Tines Stories AWS accounts permission to assume this role, using the External ID from step 1.
{
  "Version": "2012-10-17",
  "Statement": [
    {
      "Effect": "Allow",
      "Principal": {
        "AWS": "857223745291"
      },
      "Action": "sts:AssumeRole",
      "Condition": {
        "StringEquals": {
          "sts:ExternalId": "ExternalId"
        }
      }
    },
    {
      "Effect": "Allow",
      "Principal": {
        "AWS": "825838939522"
      },
      "Action": "sts:AssumeRole",
      "Condition": {
        "StringEquals": {
          "sts:ExternalId": "ExternalId"
        }
      }
    }
  ]
}
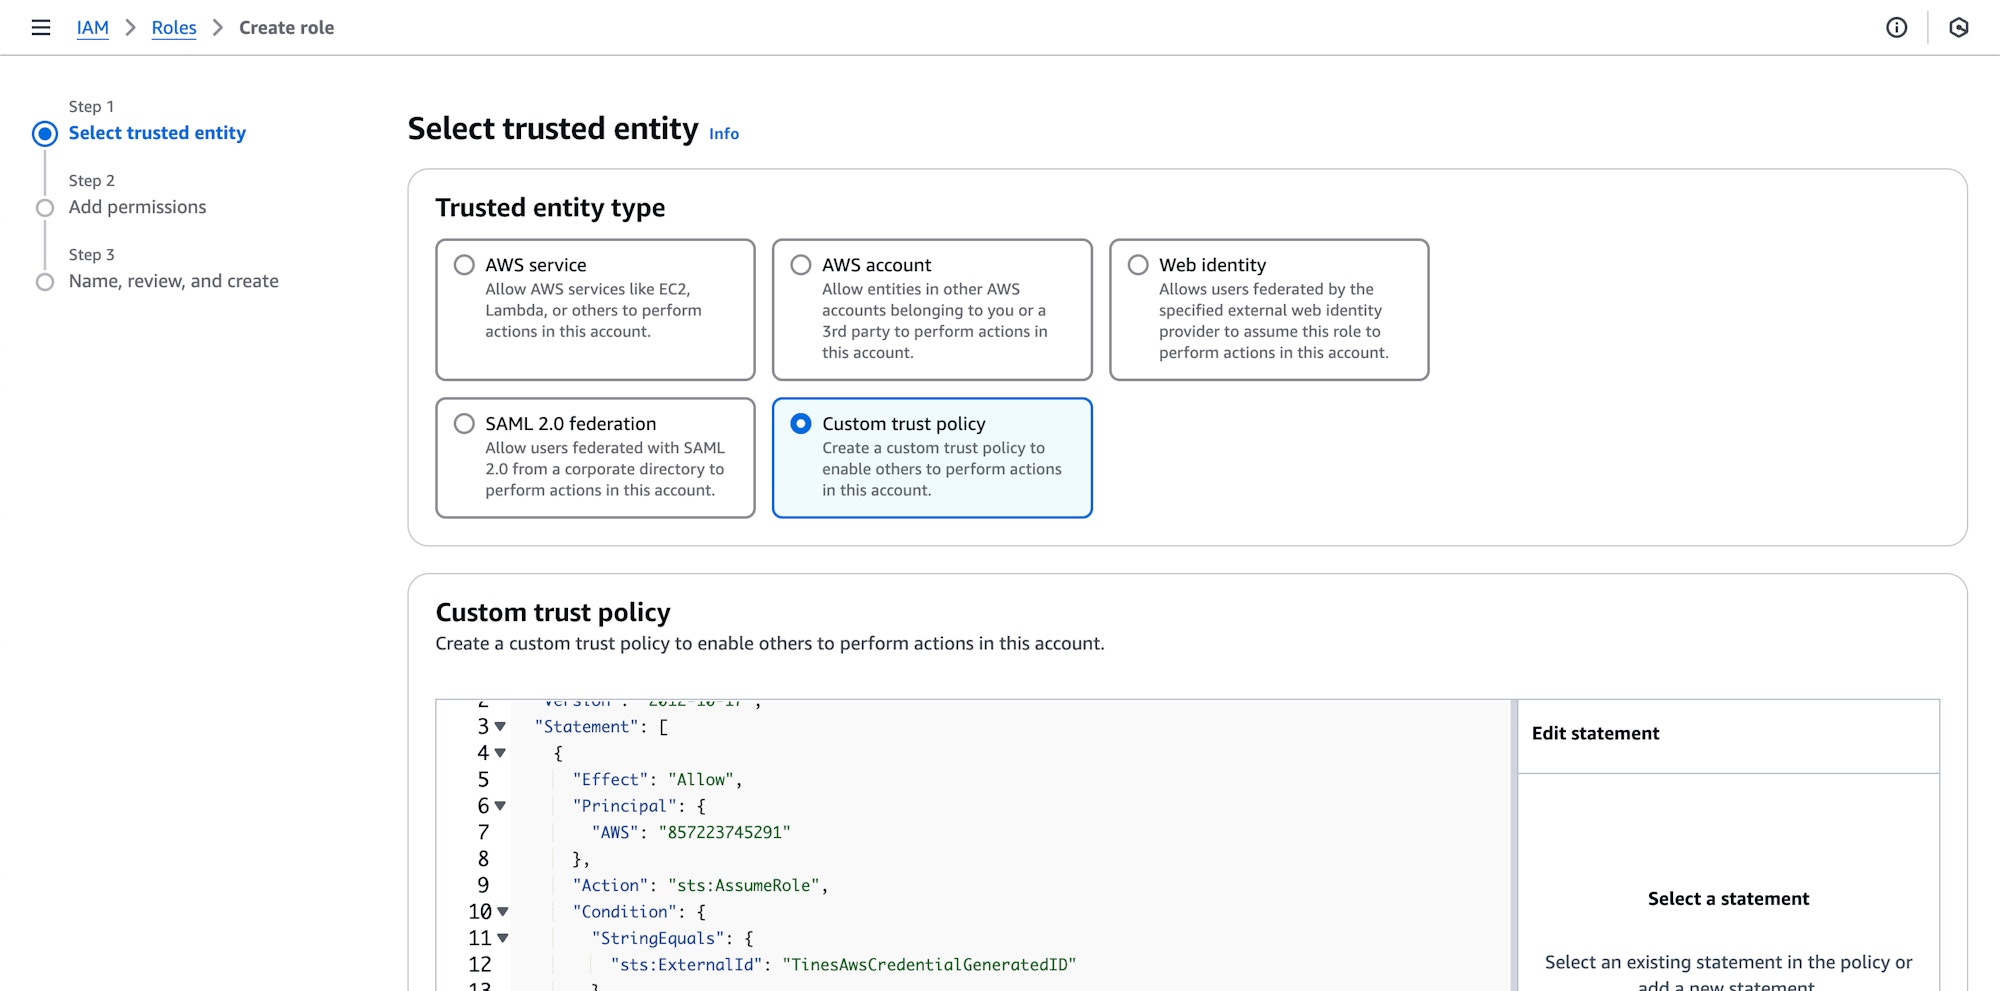
Complete the "Add permissions" and "Name, review and create" steps to finish creating your Role.
If you have a dedicated stack, you can restrict access further by including your dedicated network (VPC) IDs. You'll find these through <your-stack-name>.tines.com/info:
egress_ips: Networking IPs for Tines Stories AWS account principal -825838939522lambda_egress_ips: Networking IPs for Tines Lambda AWS account principal for use in run script actions -857223745291
{
  "Version": "2012-10-17",
  "Statement": [
    {
      "Effect": "Allow",
      "Principal": {
        "AWS": "arn:aws:iam::857223745291:root"
      },
      "Action": "sts:AssumeRole",
      "Condition": {
        "StringEquals": {
          "sts:ExternalId": "xxxx"
        },
        "IpAddressIfExists": {
          "aws:SourceIp": [
            "xx.xx.xxx.xxx",
            "xx.xx.xxx.xxx"
          ]
        }
      }
    },
    {
      "Effect": "Allow",
      "Principal": {
        "AWS": "arn:aws:iam::825838939522:root"
      },
      "Action": "sts:AssumeRole",
      "Condition": {
        "StringEquals": {
          "sts:ExternalId": "xxxxx"
        },
        "IpAddressIfExists": {
          "aws:SourceIp": [
            "xx.xx.xxx.xxx",
            "xx.xx.xxx.xxx"
          ]
        }
      }
    }
  ]
}
Step 3: Add your Role's ARN to your Tines Stories Credential
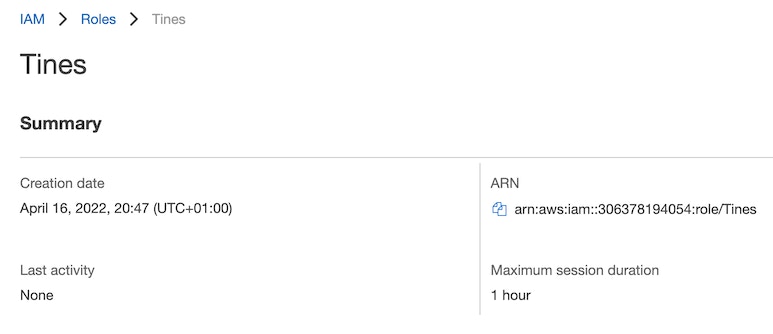
In the AWS console, open the Role you just created and copy the ARN:
Paste it into the Role ARN field of your Credential in Tines Stories and click "Save credential":
Static External IDs
By default, a new and unique external ID is generated for each AWS credential created. More information on external IDs can be found in the AWS docs↗. Optionally when creating a role-based access AWS credential you can opt to use a static external ID that is scoped to a team. Each credential in the team that uses this option will have the same external ID.
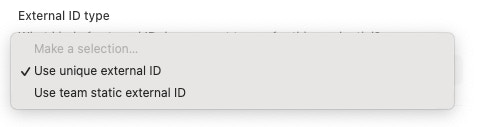
If you need to rotate a static external ID you can use the destroy static external ID API endpoint which will delete the current static external ID for that team. A new one can be generated by creating a new AWS credential that uses the static external ID option. Previously created credentials are not affected.
Source Identity
When creating or editing an AWS credential that assumes a role, you can optionally set a source identity. When set, Tines includes it as the source identity on every request to assume the role, and AWS records it in your CloudTrail logs for the duration of the role session. This makes it easier to attribute activity performed through Tines when auditing your AWS account.
A source identity must be between 2 and 64 characters and can only contain letters, numbers, underscores, and the characters +=,.@-.
Source identity is available for role-based access credentials, and for key-based access and instance profile credentials that assume a role.
Source identity is supported on both cloud and self-hosted environments. On self-hosted environments, where role-based access is not available, it applies to key-based access and instance profile credentials that assume a role.
Updating your role's trust policy
If you set a source identity, the role's trust policy must also allow the `sts:SetSourceIdentity` action. Allow it in a separate statement from the one containing the `sts:ExternalId` condition, as that condition isn't satisfiable while AWS authorizes `sts:SetSourceIdentity`, so combining them causes an access denied error when the role is assumed.
For example, add the following statement to the trust policy from step 2 above:
{

  "Effect": "Allow",
  "Principal": {
    "AWS": "825838939522",
  },
  "Action": "sts:SetSourceIdentity"
}
Optionally, you can restrict which source identity values are allowed using the `sts:SourceIdentity` condition key:
{

  "Effect": "Allow",
  "Principal": {
    "AWS": "825838939522",
  },
  "Action": "sts:SetSourceIdentity",
  "Condition": {
    "StringEquals": {
      "sts:SourceIdentity": "your-source-identity"
    }
  }
}
For key-based access and instance profile credentials, the calling IAM principal must also be allowed to perform the `sts:SetSourceIdentity` action in its IAM policy.
The source identity applies wherever the credential is used to assume the role: HTTP Request actions, Run Script actions, and AWS Bedrock AI providers.
Security boundaries for AWS credentials
We use Tines-owned roles to assume role into your AWS account. The AWS accounts we own that call AWS credentials are:
Tines Stories AWS account:
825838939522Tines Stories Lambda AWS:
857223745291
We require an External ID to be set on the IAM role permissions you set up so that only the AWS credential you create in your tenant can be used to access your AWS data.
To ensure another layer of restriction for dedicated tenants, please apply VPC egress IP rules to ensure that only requests from your dedicated Tines VPC tenant can be used to access your AWS data.
We don't share IAM role ARNs with customers because they do not provide any meaningful extra layer of security in our infrastructure boundary than External IDs and VPC restrictions, and also because they are much more likely to change.
Workload identity (OIDC) credentials don't use these accounts or external IDs. Trust is pinned to your tenant's issuer URL and the credential's subject in the role's trust policy, and your role's trust policy never needs to name a Tines account.
Workload identity (OIDC)
With workload identity, Tines assumes a role in your account by presenting a short-lived OpenID Connect (OIDC) token that it signs for the credential, and AWS exchanges it for temporary credentials with AssumeRoleWithWebIdentity↗. No Tines AWS account and no external ID are involved: the role trusts your tenant's issuer URL and this credential's subject, and nothing else can assume it. See workload identity federation for how the trust details work.
Step 1: Create your AWS credential in Tines
Create a new credential, select Manual creation, then AWS, and set the Authentication type to Workload identity (OIDC). Tines shows the credential's Issuer URL and Subject. The Audience defaults to sts.amazonaws.com; keep it unless you need a custom value. Keep the credential open while you complete the next two steps; the trust details don't change.
Step 2: Create the identity provider and role in AWS
In IAM, go to Identity providers › Add provider. Choose OpenID Connect, enter the issuer URL as the Provider URL, and the audience (
sts.amazonaws.com) as the Audience. AWS fetches Tines' signing keys from the provider URL, so it must stay reachable.Go to Roles › Create role and choose Web identity. Select the identity provider you just created and the audience.
Edit the role's trust policy so it only accepts this credential's subject. Replace the account ID, issuer host and path, and subject with your values:
{
  "Version": "2012-10-17",
  "Statement": [
    {
      "Effect": "Allow",
      "Principal": {
        "Federated": "arn:aws:iam::123456789012:oidc-provider/example.tines.com/oidc/abc123"
      },
      "Action": "sts:AssumeRoleWithWebIdentity",
      "Condition": {
        "StringEquals": {
          "example.tines.com/oidc/abc123:aud": "sts.amazonaws.com",
          "example.tines.com/oidc/abc123:sub": "credential:053d407c-923d-4795-ac92-b1084f5540af"
        }
      }
    }
  ]
}
The condition keys are the issuer URL without https://, followed by :aud and :sub. Every Tines credential has its own subject, so each credential needs its own role or its own statement.
4. Complete the Add permissions and Name, review, and create steps.
Step 3: Add the role's ARN to your Tines credential
Copy the role's ARN, paste it into the Role ARN field, and save. Tines assumes the role to verify the setup and shows the error AWS returns if the trust policy doesn't match.
Sessions last 15 minutes and Tines renews them automatically. Workload identity credentials work with HTTP Request actions and Run Script actions. Source identity is not available for this authentication type.
A test credential has its own subject (the live subject with a :test suffix), so give it its own role, typically in a non-production account.
Key-based access
Enter the following information in the AWS New Credential page:
Credential name: Your desired AWS credential name.
Access key: The
access keyfrom your AWS Security Credentials↗.Access secret: The
access secretfrom your AWS Security Credentials↗.
If you want to assume a role↗ before performing the action, you can set values for the following fields.
Assumed Role ARN: The ARN of the role you wish to assume, e.g.:
arn:aws:iam::123456789012:role/write-access-role
Tines Stories will request a session with the minimum duration (15 minutes).
Bedrock API key
To authenticate with AWS Bedrock using an API key, select Bedrock API key as the authentication type.
Enter the following information in the AWS New Credential page
Credential name: Your desired AWS credential name.
API key: Your Bedrock API key.
This will be used for bearer token authentication.
For more details on Bedrock API keys, see the AWS documentation↗
Using an AWS credential with a HTTP Request Action
To use an AWS credential with a HTTP Request action, include a CREDENTIAL formula expression in the action's Authorization header.
Sample AWS HTTP Request Actions
Scan a DynamoDB Table
{
  "url": "https://dynamodb.eu-west-1.amazonaws.com",
  "method": "post",
  "content_type": "json",
  "payload": {
    "TableName": "TestTable",
    "AttributesToGet": ["Id"]
  },
  "headers": {
    "Authorization": "<<CREDENTIAL.aws_dynamo_db>>",
    "X-Amz-Target": "DynamoDB_20120810.Scan"
  }
}
List Cloudtrails
{
  "url": "https://cloudtrail.us-east-1.amazonaws.com",
  "method": "get",
  "content_type": "form",
  "payload": {
    "Action": "DescribeTrails",
    "Version": "2013-11-01"
  },
  "headers": {
    "Authorization": "<<CREDENTIAL.aws_cloudtrail>>"
  }
}
List IAM Users
{
  "url": "https://iam.amazonaws.com",
  "content_type": "form",
  "method": "get",
  "payload": {
    "Action": "ListUsers",
    "Version": "2010-05-08"
  },
  "headers": {
    "Authorization": "<<CREDENTIAL.aws_iam>>"
  }
}