Overview
Teams regularly need to perform the same task or a set of tasks across different stories. For example, a threat intelligence story and a phishing response story may use the same procedure to analyze a URL. Similarly, a user deprovisioning story and a vulnerability management story may both require the creation of a Jira ticket.
Rather than recreating the same set of actions across different stories (thus violating the DRY-principle), Send to Story allows users create reusable "sub-stories" to which events can be sent from other stories. When an event is received by a sub-story, the sub-story will perform its action and when finished, emit an event from the calling action.
❗️Important
Sub-stories
Sub-stories work exactly the same as normal Tines stories. The key difference is that a sub-story has an input action and an output action. The input action must be a webhook type action and the output action must be a message-only mode event transform action.
Enabling a story for Send to Story (creating a sub-story)
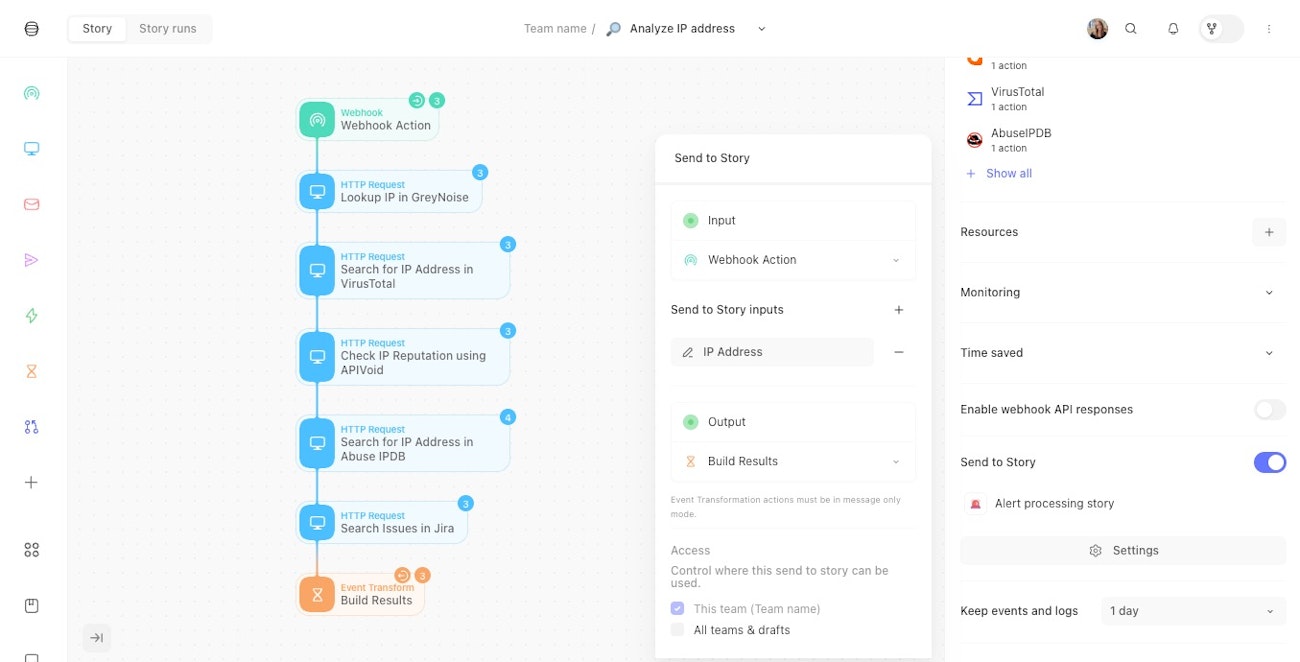
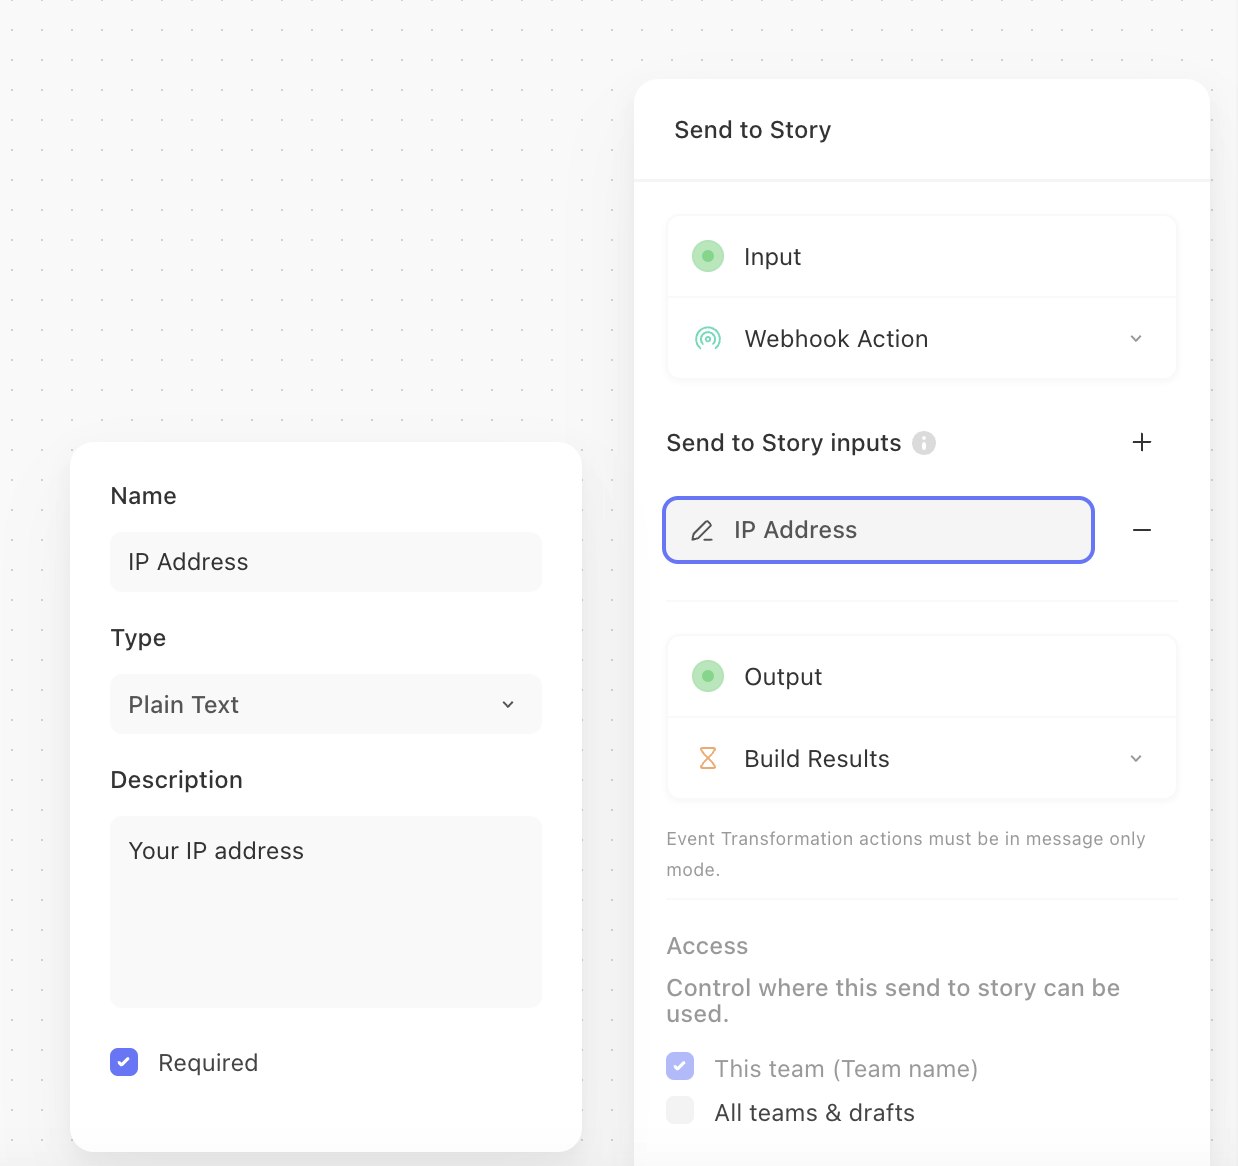
In the storyboard's properties panel (visible when no actions are selected), toggle the Send to Story option to enable it. A modal will appear to specify input and output actions. A Send to Story can only have one input action, but it can have many output actions. Once an input action is defined, you can specify input parameters for your Send to Story: the required inputs needed for the story to run.
⚠️Warning
Input
When an event is sent to a Send to Story, the input action will emit an event to its receiver actions. Input actions must be of type Webhook.
Send to Story inputs
Inputs are the defined values your sub-story needs to run. These will be auto-populated in the Send to Story action when your sub-story is specified. These inputs can also be updated on the webhook action itself.
⚠️Warning
Updates to Send to Story inputs
You can update Send to Story inputs from the configuration panel or the webhook editor at any time. Once updated, any send to story actions calling your sub-story will reflect these changes visually, but their editor configuration (<Editor> button on the action) will not change.
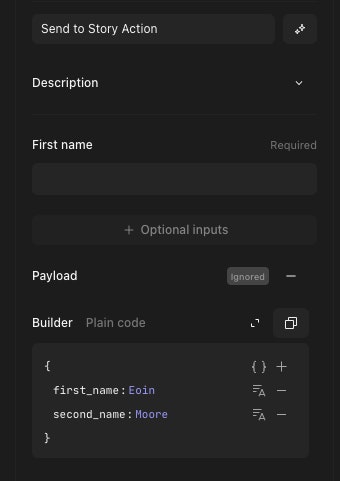
If you do not have any send-to-story inputs defined, the payload of the Send to Story action will be received by the input action. If you do have Send to Story inputs defined, regardless of the editor configuration defined on the Send to Story action, only the defined Send to Story inputs of your sub-story will be received by the input action. If you have a payload defined for a Send to Story action that doesn't have Send to Story inputs defined, and you add Send to Story inputs to the input action, the payload will be ignored. The payload will still be visible on the action configuration but it will be marked "ignored".
A Send to Story action that does not send all required inputs will fail and log an error that the call is missing required inputs.
Output
The output actions are the last action in a Send to Story and must be message-only mode event transform actions. The content specified in the Exit action will be emitted by the Send to Story action that originally sent the event to the sub-story.
Access
Controls who is allowed to send to this story. Either select 'All teams' to allow any team to send to this story, select the specific teams that should have acces and/or select current team's members' personal teams to share with all members of the current team that have story run permissions. Users must have story manage permissions in the current team to share the story.
You can view all Send to Stories available to your team by clicking the "Shared with this team" section in the stories page. You will not be able to view or modify the contents of the story unless you have the relevant permissions in the team owning said story.
💡Note
Timeout settings
When invoked as a tool from Workbench or an AI Agent, a story with this setting enabled will gracefully conclude after the specified timeout duration has elapsed if the story did not complete in time.
Enable for
Controls where this send to story can be used:
Send to Story: Story can be called via the Send to Story action
Workbench and Send to Story: Story can be called via the Send to Story action and Workbench.
Workbench: Story can only be called via Workbench and cannot run autonomously (i.e. scheduled actions will not run and the webhook will not accept events from outside of Workbench). Story will not be counted towards license count.
Sending to a sub story
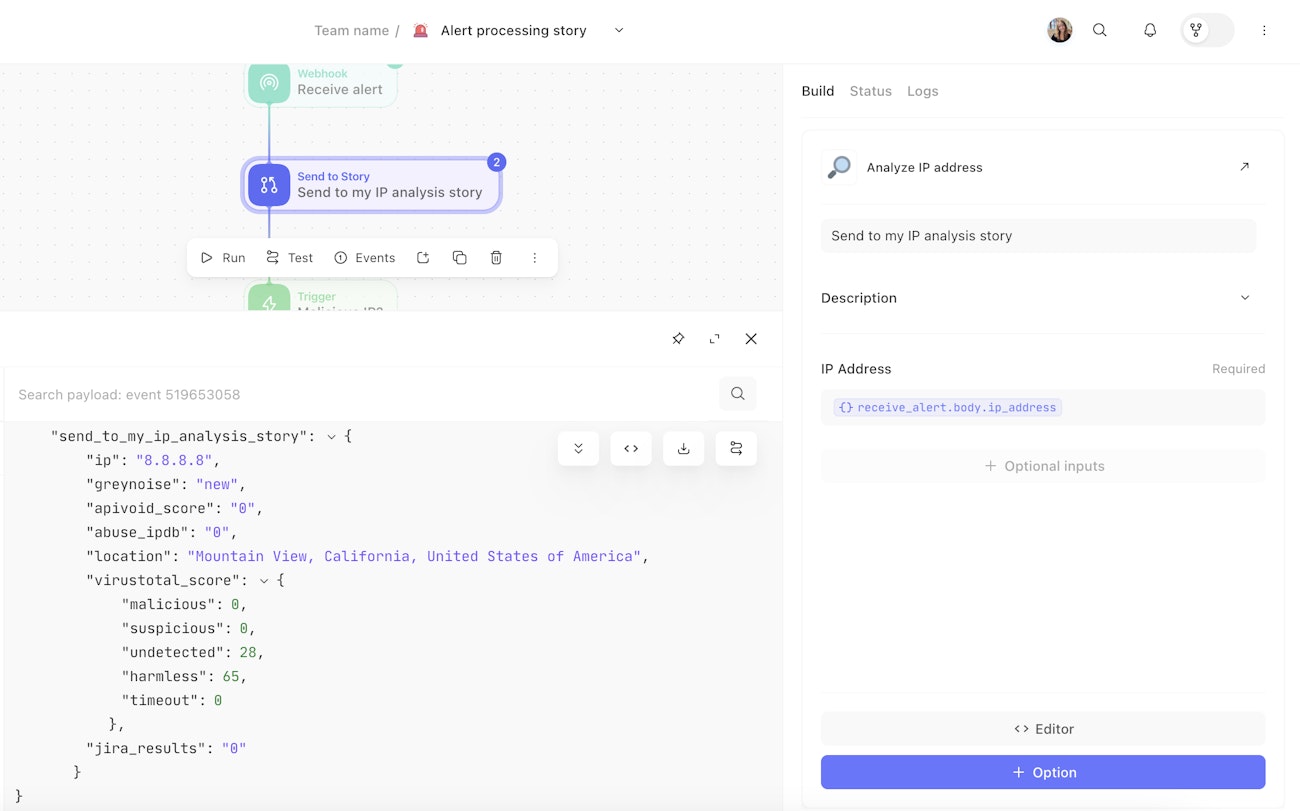
To send data to a sub-story, use a Send to Story action. Select the sub-story you would like to use and enter the required parameters.
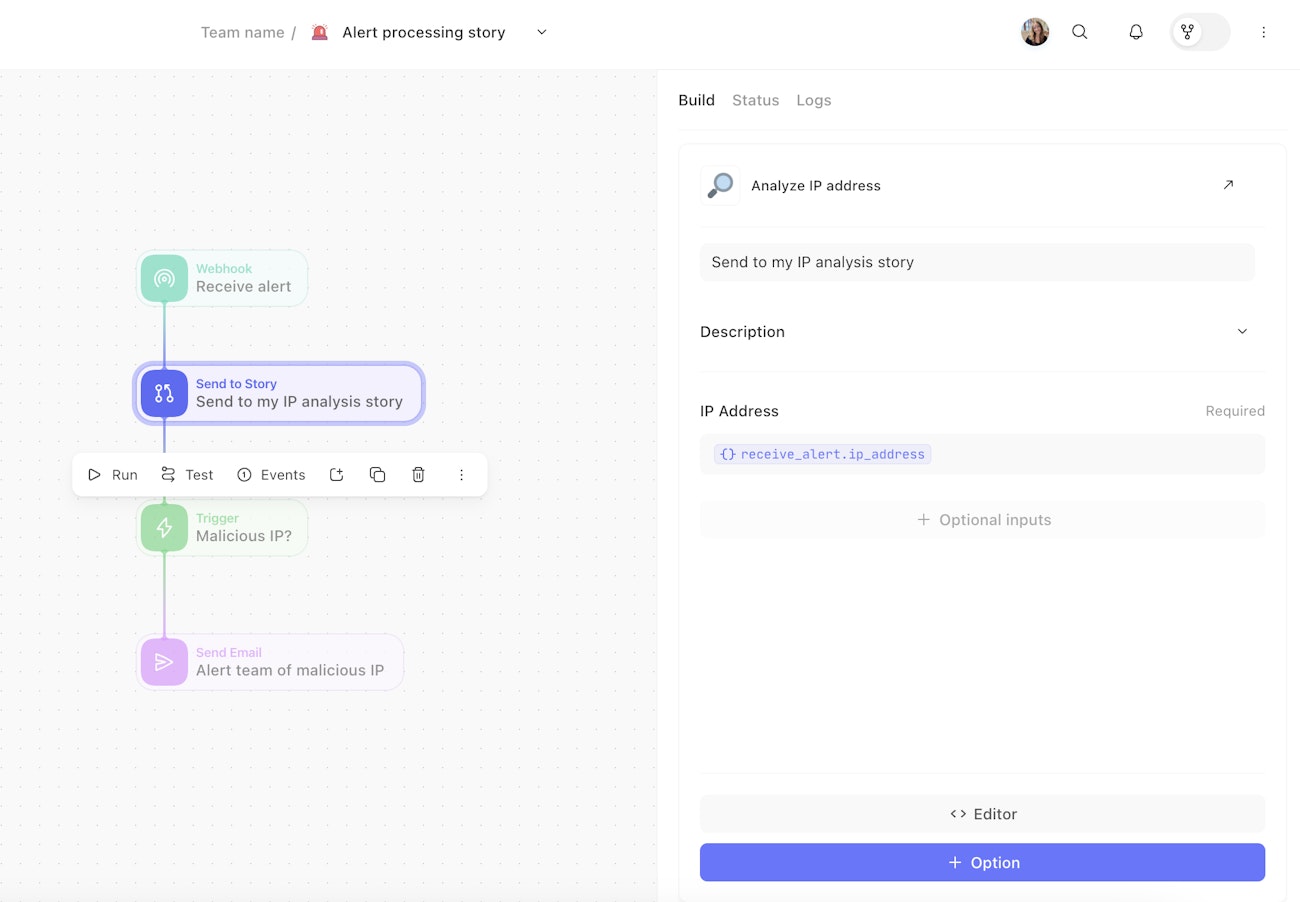
When this action runs, it will send the inputted values to the defined sub-story. The input action in the sub-story will then emit an event similar to the below:
{
"webhook_action":{
  "#event_id":519633304,
  "#agent_id":398737,
  "body":{
    "ip_address": "8.8.8.8"
    }
  }
}
When this event reaches the defined output action, an event will be emitted at the calling Send to Story action that matches the Exit action's configuration.
In the example, the sub-story Analyze IP Address has the following data defined in its output action.
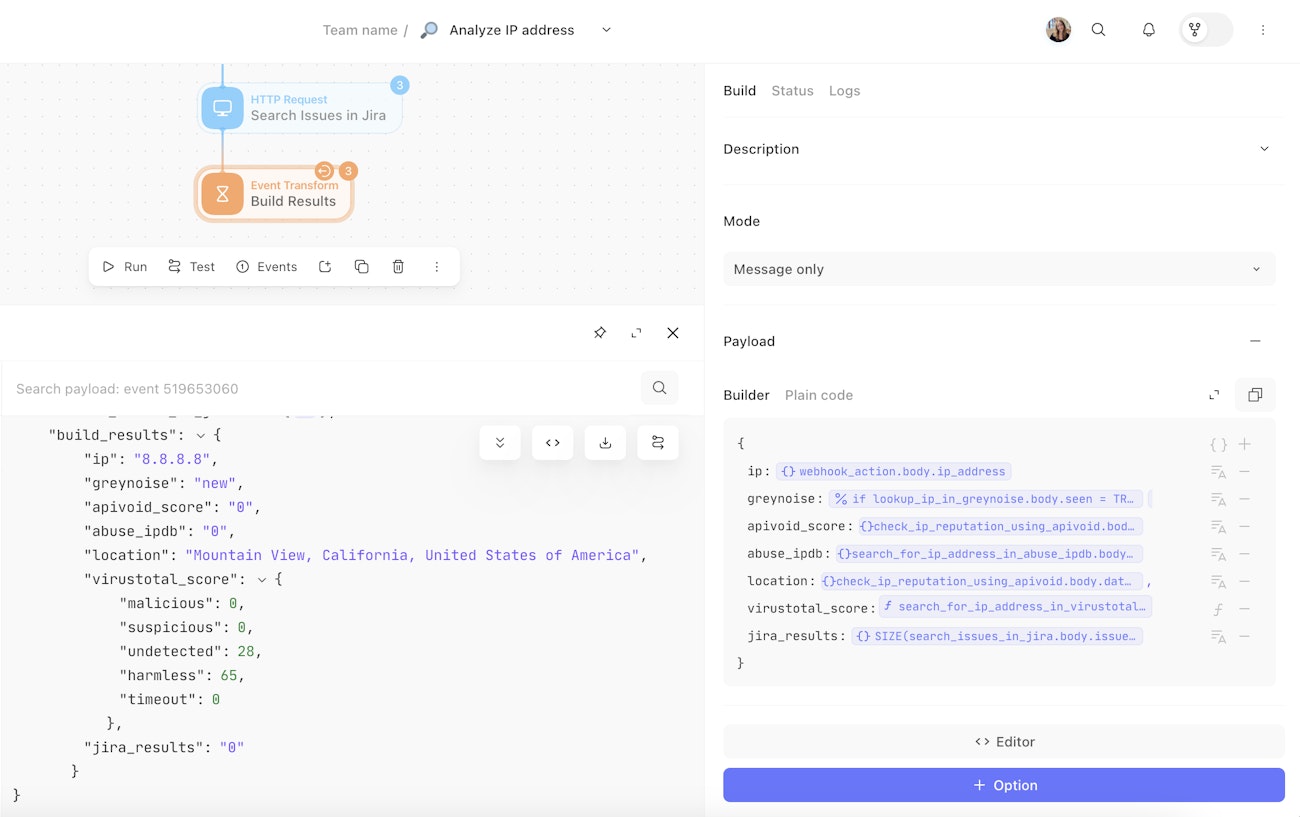
This same data is sent back to the Send to Story action that called the sub-story.
View all stories calling your sub-story
Within the overview pane of your sub-story, you can see all stories that you have access to that call your sub-story with a Send to Story action. In the example throughout this document, a story Alert processing story uses a send to story action to call the Analyze IP address sub-story. You can see this story listed within the sub-story as a story that calls it.

Retrieving event data from Story runs using Send to Story
This feature is now documented under Workflows as APIs.