We optionally support single sign-on (SSO) on all Tines tenants, paid and Community Edition alike.
This allows users on your Tines account to sign in with their existing account on your external identity provider.
Enabling SSO
To turn SSO on for your tenant, go to the settings center and choose "Authentication" under "Access & security" and follow the instructions below after selecting an SSO option.
🪄Tip
💡Note
Disabling SSO
💡Note
To disable SSO in the Authentication settings UI, set it to "default" - tines.com.
ℹ️Info
SAML configuration
Setting up SSO via SAML requires two pieces of information from your external SAML identity provider (IdP):
A URL, which we’ll redirect users to when signing in.
Your IdP’s X.509 public certificate. You can also instead use a fingerprint, which is a digest of the certificate. This must be generated using SHA-256, such as with samltool.com. Using the fingerprint instead is discouraged, as it prevents extra security features.
⚠️Warning
Enhanced SAML Security
Tines also supports additional SAML security features, such as encryption and signing. Contact our support team if you'd like to enable these for your tenant.
OIDC configuration
Setting up SSO via OpenID Connect (OIDC) requires six pieces of information from your external OpenID provider (OP):
Your OAuth client ID.
Your OAuth client secret.
The authorization endpoint URL - e.g.
https://accounts.google.com/o/oauth2/v2/authfor Google orhttps://<YOUR-DOMAIN>/oauth2/authorizefor AWS Cognito.The token endpoint URL - e.g.
https://accounts.google.com/o/oauth2/v2/authfor Google orhttps://<YOUR-DOMAIN>/oauth2/tokenfor AWS Cognito.The issuer or issuer identifier URL - e.g.
https://accounts.google.comfor Google orhttps://cognito-idp.<YOUR-REGION>.amazonaws.com/<YOUR-USER-POOL-ID>for AWS Cognito.The JSON Web Key Set (JWKS) URL - e.g.
https://www.googleapis.com/oauth2/v3/certsfor Google orhttps://cognito-idp.<YOUR-REGION>.amazonaws.com/<YOUR-USER-POOL-ID>/.well-known/jwks.jsonfor AWS Cognito.
Items 3 to 6 can be found in your OP’s "provider metadata" or "discovery document", which is normally located at a URL that ends with .well-known/openid-configuration - e.g. https://accounts.google.com/.well-known/openid-configuration for Google or https://cognito-idp.<YOUR-REGION>.amazonaws.com/<YOUR-USER-POOL-ID>/.well-known/openid-configuration for AWS Cognito.
Tines requires that your OP supports the "Authorization code grant" OAuth flow and the "email", "openid" and "profile" OAuth scopes.
Just-in-time user provisioning
See here for documentation on just-in-time configuration.
SCIM user provisioning
See here for documentation on SCIM integration.
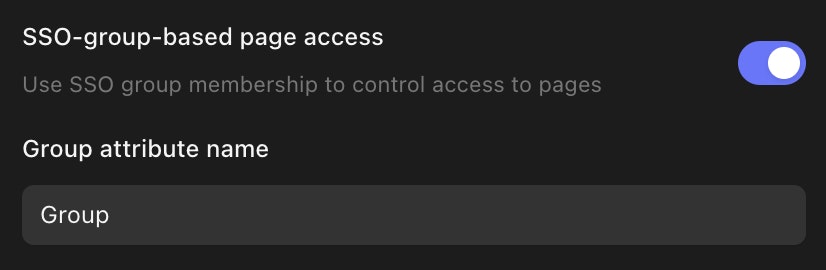
SSO-group-based page access
💡Note
It's also possible to restrict access to specific pages based on SSO group membership. To enable this feature, you need to turn on SSO-group-based page access in Authentication settings. You will also need to provide a Group attribute name. This should match the name of the SAML or OIDC attribute containing the group name in your Identity Provider.
When the setup is completed, you will be prompted to terminate all ongoing sessions on your tenant. This is advised as the groups memberships will not be refreshed for each user until a new session is started.
Finally, you can configure specific pages to use SSO-group-based-page-access.