


⚠️Warning
The CrowdStrike Falcon platform is a powerful solution that includes EDR (Endpoint Detection and Response), next-generation anti-virus, and device control for endpoints. It also provides a whole host of other operational capabilities across IT operations and security including threat intelligence. Today, we’re going to take a brief look at how to get connected (and authenticated) to the CrowdStrike API. This will enable us to avail of many of the below aspects of the Falcon platform.

CrowdStrike modules and functionality
CrowdStrike automation and APIs
When diving into any API, the first concerns tend to be:
Where and what sort of documentation does the API have?
What specific endpoint(s) can I access?
How do I authenticate?
Are there any prerequisites, limitations, or ‘gotchas’ ?
What tooling can I use to quickly prototype and test?
CrowdStrike API documentation (must be logged in via web to access!)
Note: Links below will depend upon the cloud environment you log in to (US-1, US-2, US-GOV-1, EU-1) and will follow the same hostname pattern as that login URL.
Main CrowdStrike documentation here.
REST API user manual here (OAuth2.0 based authentication model as key-based APIs are considered legacy and deprecated by CrowdStrike).
REST API reference documentation (Swagger/OpenAPI) based upon your account/login:
US-1 https://assets.falcon.crowdstrike.com/support/api/swagger.html
US-2 https://assets.falcon.us-2.crowdstrike.com/support/api/swagger-us2.html
US-GOV-1 https://assets.falcon.laggar.gcw.crowdstrike.com/support/api/swagger-eagle.html
EU-1 https://assets.falcon.eu-1.crowdstrike.com/support/api/swagger-eu.html
Support portal (requires entitlement) here.
CrowdStrike API endpoints
Depending on your type of account you will use a specific endpoint to access the API. As we’re using a US-2 account we’ll be hitting "api.us-2.crowdstrike.com". Apply the relevant subdomain based upon where your account resides:
US-1 “api.crowdstrike.com”
US-2 “api.us-2.crowdstrike.com”
US-GOV-1 “api.laggar.gcw.crowdstrike.com”
EU-1 “api.eu-1.crowdstrike.com”
CrowdStrike API authentication
As briefly mentioned above there is OAuth2.0 authentication and key-based authentication (but key-based is now deprecated).
CrowdStrike API limitations
Every API call will have 2 metrics in the response header related to your customer account:
x-ratelimit-limit which is the maximum number of calls allowed per minute
x-ratelimit-remaining remaining calls allowed in that time window
Note: Only when you exceed this will the third metric become available:
x-rateLimit-retryafter a UTC epoch timestamp of when your rate-limit pool will have at least 1 available request
Tooling
cURL on the CLI is normally the fastest way to test though with OAuth2.0 it means using spurious parameters when authenticating for an implicit grant (which can become confusing). Postman can also be used in the following example, however, we will be using Tines which has native support for OAuth2.0 (allowing us to generate, use, and renew tokens with a single simple step).
Quick setup up
Step 1. CrowdStrike client key and secret
First, we ensure that we are logged in to the Falcon platform and have an admin role. Then go to “Support/API Clients and Keys/Add new API client”. Here we name our key, give it a description, and also allocate the scopes required. For now, we shall only enable read permissions but across all available endpoints (normally you would refine this to a more fine-grained least privilege status).
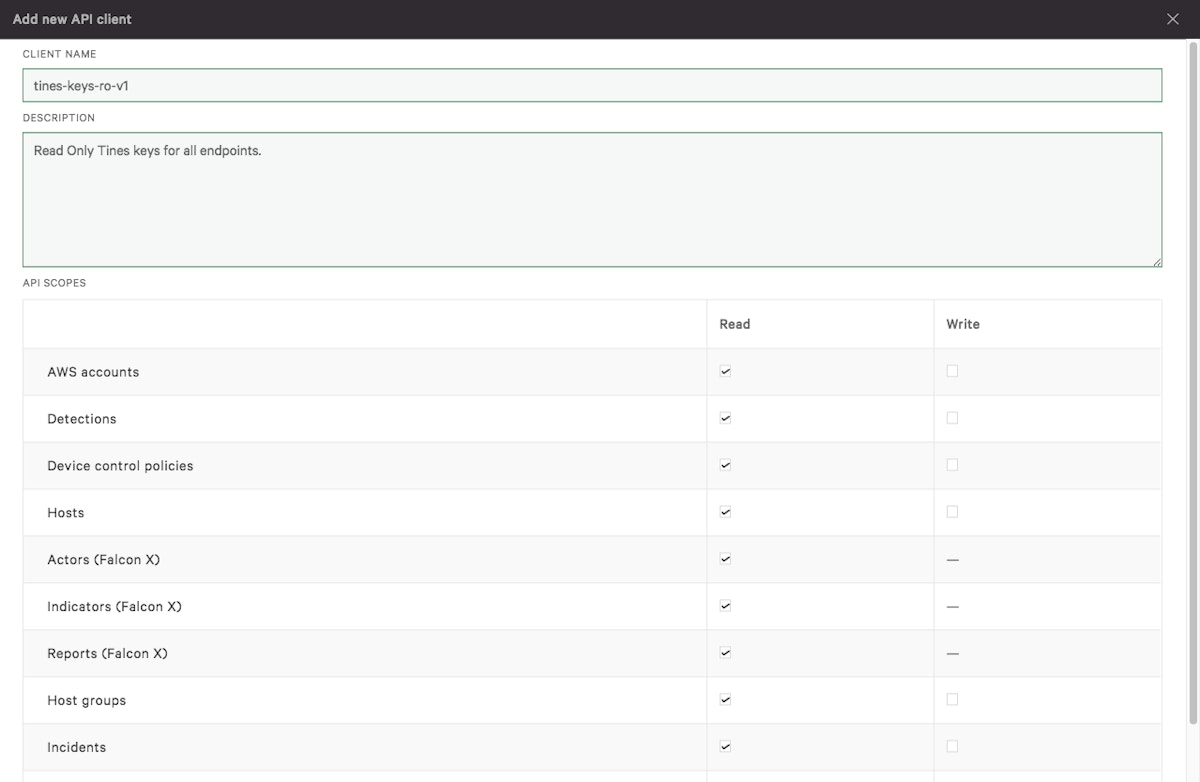
Creating a new API key in CrowdStrike Falcon
After clicking “Add” you should receive a confirmation box saying “API client created” which contains a “Client ID” and “Secret”. Store these somewhere safe (just as you would a password) as we will need them to generate our tokens. The “Client ID” will be a 32-character lowercase hexadecimal string and the “Secret” will be a 40-character upper and lowercase alphanumeric string.
Step 2. Tines creation of CrowdStrike Credentials
In Tines, you now go to “Credentials” and click “+ New Credential”. Then use the following settings:
Type: OAuth2.0
Credential name: CrowdStrike
Callback url: https://<your_tines_tenant_name></your_tines_tenant_name>.tines.io/oauth2/callback
Client id: <client_id_from_the_previous_step></client_id_from_the_previous_step>
Client secret: <secret_from_the_previous_step></secret_from_the_previous_step>
Scope: Read Write
Grant Type: client_credentials
OAuth authorization request URL: https://api.us-2.crowdstrike.com/oauth2/token
OAuth token URL: https://api.us-2.crowdstrike.com/oauth2/token
Note: Ensure you replace your <client_id_from_the_previous_step> </client_id_from_the_previous_step>and <secret_from_the_previous_step>.</secret_from_the_previous_step>
You should now have a credential listed called “CrowdStrike” on the main credentials page. There is also a shortcode `{{ CREDENTIAL..crowdstrike }}` listed next to it which we will use shortly inside a Tines HTTP Action.
Step 3. Tines create resource
Here we shall save ourselves some time by defining the CrowdStrike API FQDN (Fully Qualified Domain Name) i.e., “us-2.crowdstrike.com” so we can use it across multiple Actions and update it in one go if required.
In Tines, go to “Resources” and create a new resource using “+ New Resource” with the following settings:
Name: crowdstrike_domain
Builder (text): us-2.crowdstrike.com
There should now be a “Resource” called crowdstrike_domain with a shortcode `{{ RESOURCE.crowdstrike_domain }}`.
Step 4. Using our credentials
Now let’s create a new Tines Story, search for a CrowdStrike Action (in the search box on the left-hand side type “crowd” ), and then drag a CrowdStrike Action such as “Get Detections in CrowdStrike Falcon” onto our Storyboard.

Drag and drop the CrowdStrike Falcon Action to the Storyboard
If we look in the Action panel on the right-hand side (click the Action to ensure you can see its properties), you should see the underlying keys and values. Ensure they reflect the below i.e. include our shortcodes: “{% global_resource crowdstrike_api %}”, “{% credential crowdstrike %}”.
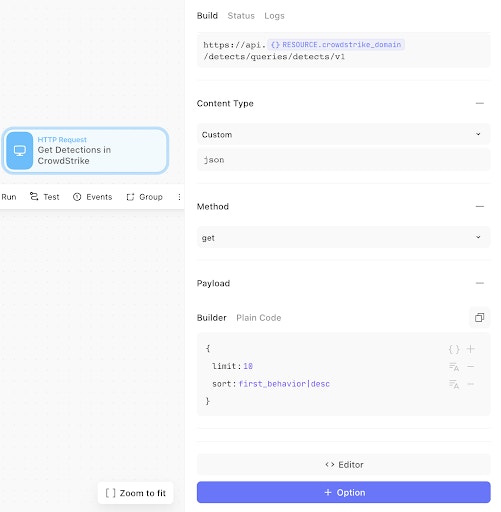
CrowdStrike Falcon Action properties using a resource and credential
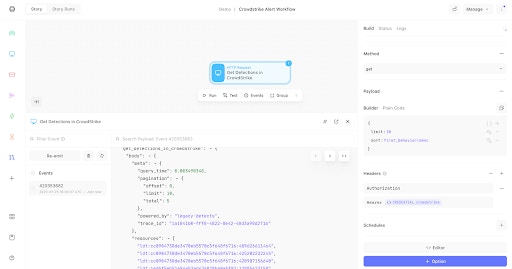
We can now test the Action (ensure the Action is clicked) and press play on the “▷ Run” button.
CrowdStrike Falcon Action properties using a resource and credential
Click on the “Events” tab (next to the “Properties” tab), and you should see an event. Hover over the event ID and click “Show”. Click on any ellipses "..." in the pop-up (modal) to expand the fields to show the below. You should see a return HTTP status of 200, and if there are any detections, they will be listed in “resources” with a prefix of “ldt".

CrowdStrike Falcon Events showing detection IDs and an HTTP status of 200
We can now replicate this method of ensuring our “Resources” and “Credentials” are included in any Action that needs to make authenticated calls to the CrowdStrike API.
Why not go ahead and try a few more Actions and construct a Story workflow or get further inspiration from this Insider Threat Hunting with Datadog and CrowdStrike blog? You can also download and import pre-built CrowdStrike Stories via our Story Library.