
Overview
Tines exists to empower people to automate work without needing coding knowledge. This bootcamp will explain concepts around using and transforming data in Tines using our built in formulas. You will also learn how to work with different types of data in Tines and how to build multiple branches in your story to take specific steps in your more complex processes.
A never ending story
It is best practice in Tines and indeed all automation is to continually iterate and improve your processes. In this session, you will take an existing story and expand it to add further capability. You will use Tines formulas to interact with and manipulate data, so your story can make dynamic decisions and make calls to other tools.
Note that to save you some time, we have set up some actions for you already. Currently this story will add a single new employee to BambooHR, but with a few changes, you will advance this story to automatically provision access to necessary tools for multiple new employees.
Set up your credential
If you have already configured a bootcamp_api credential, you can skip to “Get instead of set”, otherwise follow these steps to build your credential.
💡Note
Create a new credential by clicking anywhere on the storyboard to bring up the story menu on the right pane. Find the “Credentials” section.
Note that your story will alert you of a missing credential. Hover over bootcamp_api and click on "Connect" that is shown to the right.
Click “+ Create New” at the bottom of the modal that pops up, and then select “Text”.
Leave the name as bootcamp_api and for the value, type “secret_api_key”.
Scroll down in the credential builder and find "Domains" under the "Additional Configurations". Type in toolkit.tines.com .
💡Note
Click "Save".
Get instead of set
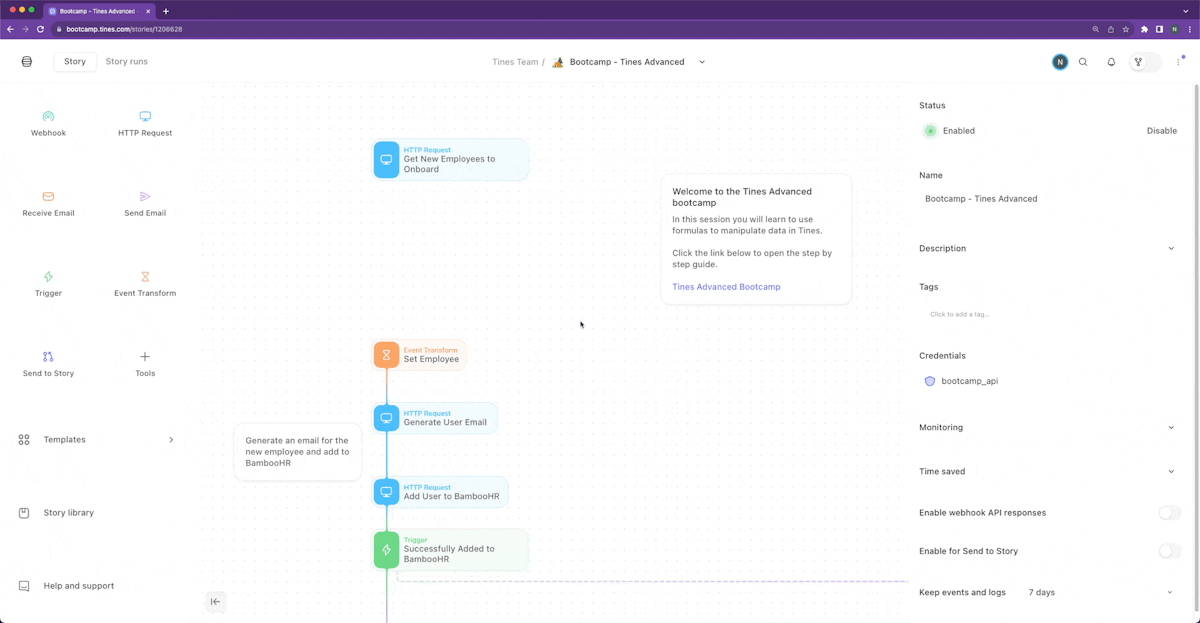
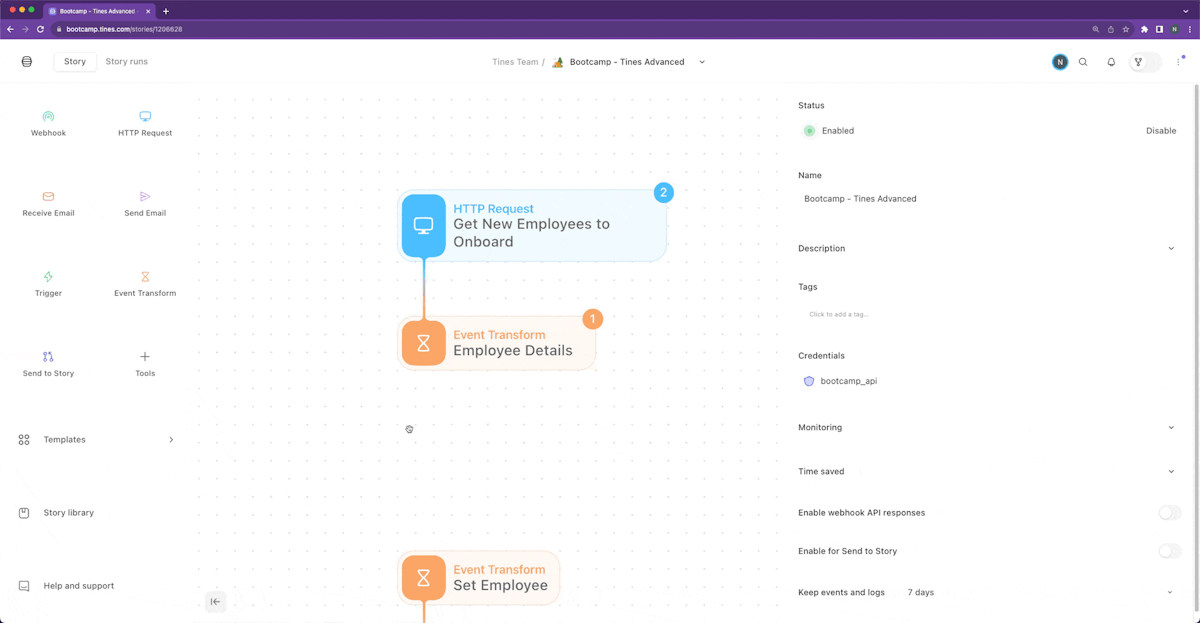
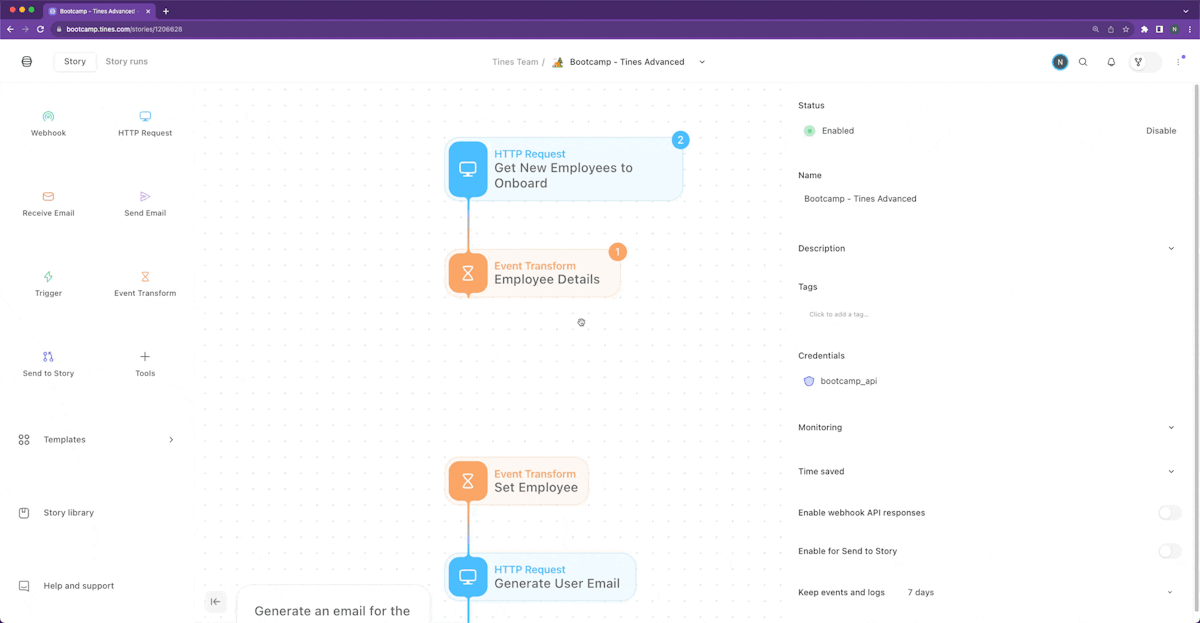
First, you’ll need to get the list of employees. To do this, click in the search bar and search for “Tines Bootcamp.” Click and drag the Tines Bootcamp template onto the storyboard. You will see the action name is "Select a template". In the configuration pane on the right side, select "Get New Employees to Onboard".
This is a preconfigured HTTP request action. Note the settings of your HTTP request in the right pane.
Before connecting it, run the action by clicking the “Run” button in the menu beneath the action.
Inspect the resulting event by clicking on “Events” in the menu beneath the action. Expand the data by clicking {...} to open each object.
Note that we have a list of employees here with names, the team they are on and other data that will not be pertinent for your story.
Click on the “x” at the top of the event pane to close it and continue building.
Using a loop
Next you will use an event transform loop to go through the list of employees that is returned and pull out the useful data. Looping is a way for an event transform action to iterate through a list of objects and apply the same logic to each item in the list. The output will be a new list with the data you specify.
Read more about loops here: https://www.tines.com/docs/actions/types/event-transformation/message-only#looping.
Drag an event transform on to the storyboard beneath the “Get New Employees to Onboard” action. Connect the actions together by hovering over the HTTP request action. Click and drag the arrow from the HTTP request to the top of your new event transform action.
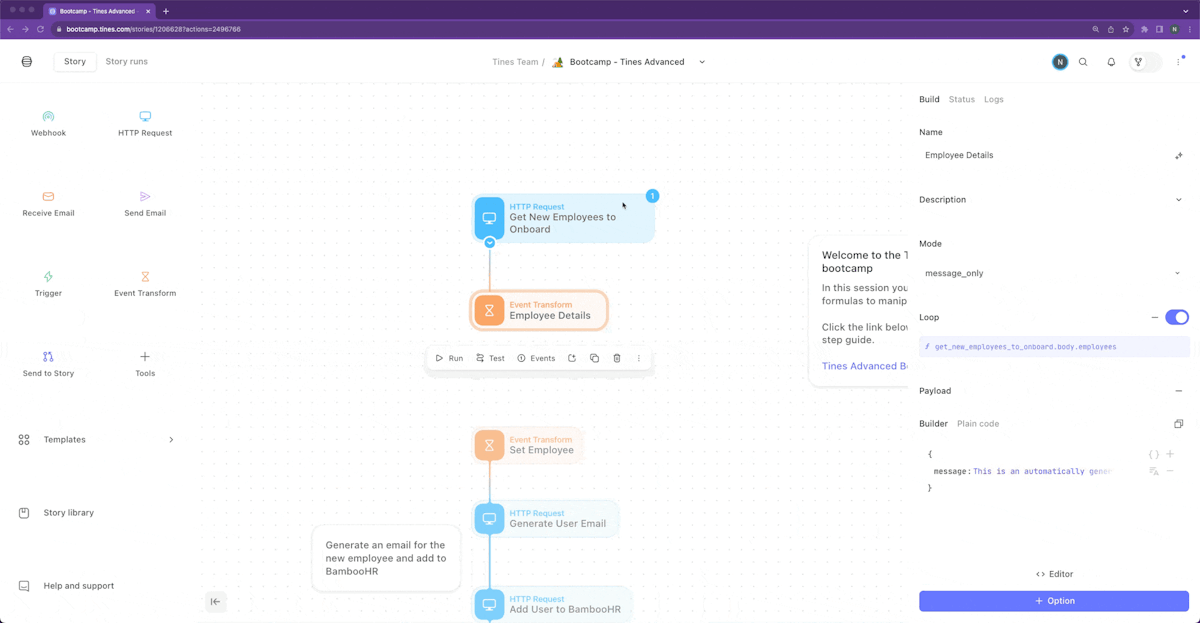
Name the event transform action “Employee Details” and click on the slider in the right pane next to the word Loop. You will be prompted for a path to loop. Erase the default entry path.to.loop and fill in get_new_employees_to_onboard.body.employees. You can auto-fill the value by beginning to type and pressing “Enter” or clicking on the value shown in the builder.
Now that your loop is built, you can reference data in the loop by using the LOOP.value object.
In the “Builder” section in the right pane, highlight message and change this to first_name.
Next, highlight and remove the value “This is an automatically generated message from Tines”.
Open the pill builder by pressing “CTRL + space” (same on Mac or PC) or clicking on the + under your cursor and then clicking Value.
Your pill here will be LOOP.value.name.first as that is the location of the first name in the object from the API call. After setting the value, you can click off of it and Tines will automatically save the change.
Add another object to the builder by clicking the plus sign + on the right side of the builder.
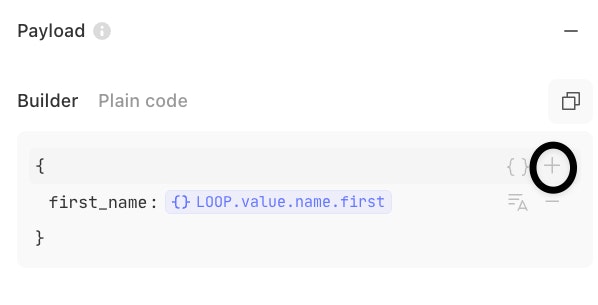
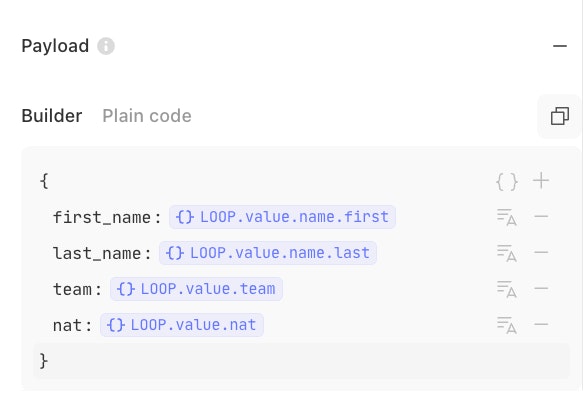
Set the new key to last_name and the value to LOOP.value.name.last.
Add two more objects by clicking on the + two more times and name them team and nat. Configure the rest of the builder as follows.
Now run from the top by clicking on the “Get New Employees to Onboard”.
View the output of the loop by clicking on the number on the top right of the action. Expand the objects in the list by clicking on [...] next to employee_details in the event pane and see that each object now only has the data that we configured in the event transform.
💡Note
Fun with formulas
Formulas is Tines’s constantly growing built in language. It is a spreadsheet style format with dozens of functions that you can use to manipulate data in Tines. When building a function, there is an inline helper that shows the documentation for the function you are using.
You can browse all of the current functions, with live example actions in our documentation at https://www.tines.com/docs/formulas/functions.
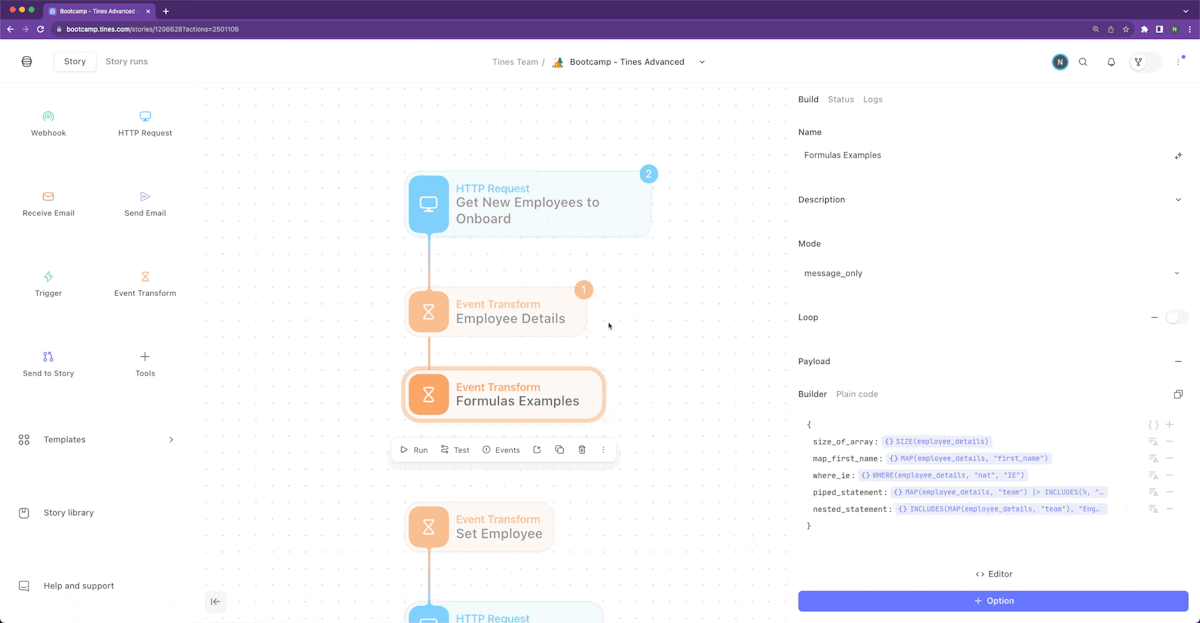
Copy the following code and paste it on to your storyboard beneath the “Employee Details” action. Connect the actions together by dragging the arrow from “Employee Details” into the top of “Formulas Examples” to get a look at a few of our top used functions.
{"standardLibVersion":"38","actionRuntimeVersion":"4","agents":[{"disabled":false,"name":"Formulas Examples","description":null,"options":"{\"mode\":\"message_only\",\"loop\":false,\"payload\":{\"size_of_array\":\"<<SIZE(employee_details)>>\",\"map_first_name\":\"=MAP(employee_details, \\\"first_name\\\")\",\"where_ie\":\"=WHERE(employee_details, \\\"nat\\\", \\\"IE\\\")\",\"piped_statement\":\"=MAP(employee_details,\\\"team\\\") |> INCLUDES(%,\\\"Engineering\\\")\",\"nested_statement\":\"<<INCLUDES(MAP(employee_details, \\\"team\\\"), \\\"Engineering\\\")>>\"}}","position":{"x":-315,"y":420},"type":"eventTransformation","timeSavedUnit":"minutes","timeSavedValue":0,"monitorAllEvents":false,"monitorFailures":false,"monitorNoEventsEmitted":null,"recordType":null,"recordWriters":[],"form":null,"cardIconName":null,"createdFromTemplateGuid":null,"createdFromTemplateVersion":null,"originStoryIdentifier":"cloud:3afcecf8d447a6289bdd4804286c9c86:b7a3a2dcf112236438e3c92eb6fed553"}],"links":[],"diagramNotes":[]}💡Note
For each example, click into the pill on the right side to view the function and the helper text. You can also see a preview of the result in the bottom right of the pill builder.
Below are brief descriptions of each of the functions shown here.
SIZE - Returns the number of letters in a string, or items in an array.
MAP - Creates an array by extracting the values of a chosen property from an array of objects.
WHERE - Selects all the elements in an array where the key has the given value.
Advanced building with formulas
Depending on the complexity of the data you are working with, you may need to use multiple functions. There are a few native features that make this easy.
Piped format - You can pass the output of one function to the input of another by using the operator |> between your functions and using % to reference the output of the function to the left of the operator.
Nested format - You can nest functions to use the output of a function as the input to another function, as shown in the nested_statement example.
Advanced Mode - If you are comfortable building and would like more of a code editor experience, you can click on the slider in the top right of the pill builder to enter “Advanced mode”. This also allows you to highlight specific functions to see the output in steps, as shown in the following gif:
To return to the normal builder mode, simply click the slider again.
Clean up
Delete the “Formulas Examples” action. Now that you are an expert in formulas, you can get back to building the story.
You can either highlight the action and press “Delete” or “Backspace” on your keyboard or you can click the trash icon on the context menu below the action.
Exploding an array
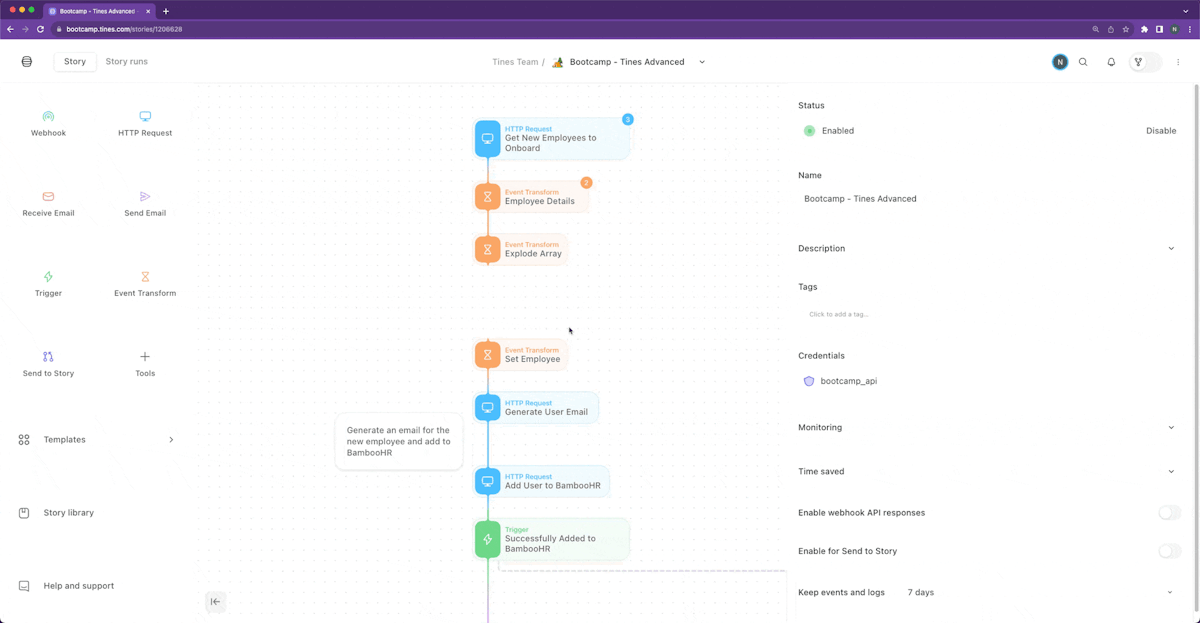
There are several employees in your list, and each one needs to follow their own branch in the story. To do this you will use an event transform action in “Explode” mode. This mode will take an array and emit an event for each element in the array, allowing the events to be processed individually in the story.
Drag an event transform action onto the storyboard below the “Employee Details” action and connect the actions together.
Name the new event transform action “Explode array”.
Click the drop down menu under “Mode” on the right pane and select “explode”.
Set the “path” for your explode action to employee_details by clicking on the pill titled your_path in the right pane and selecting employee_details from the list in the pill builder.
Note the “To” field is automatically set to individual_item. This will be the name of the object in the event that gets emitted from the action.
Click the “Get New Employees to Onboard” action, and then click the three dots on the right side of the context menu below the action. Then click on “Re-emit last event”.
💡Note
Investigate the output of the “Explode Array” action by clicking on “events”. You can check each event by clicking on them on the left side of the events pane.
Alice Tines is in the list twice! Incoming data is never perfect, so you will need to work around duplicates in the story.
You could use a UNIQ function in the path field to only explode unique elements from the array. However, that would only catch duplicates in the array each time the story runs. Luckily, there is another feature for that.
Deduplicating events
To deduplicate events across multiple story runs, you will use an event transform action in deduplicate mode. This will prevent the provisioning of the same employee twice.
Drag on another event transform action beneath the “Explode array” action, and set the “Mode” to “deduplicate”. Connect the new action to the “Explode array” and “Set Employee” actions.
Name the new action “Deduplicate events” and set the “path” to the output of your explode array action, in this case: explode_array.individual_item.
Your deduplicate action should look as follows:
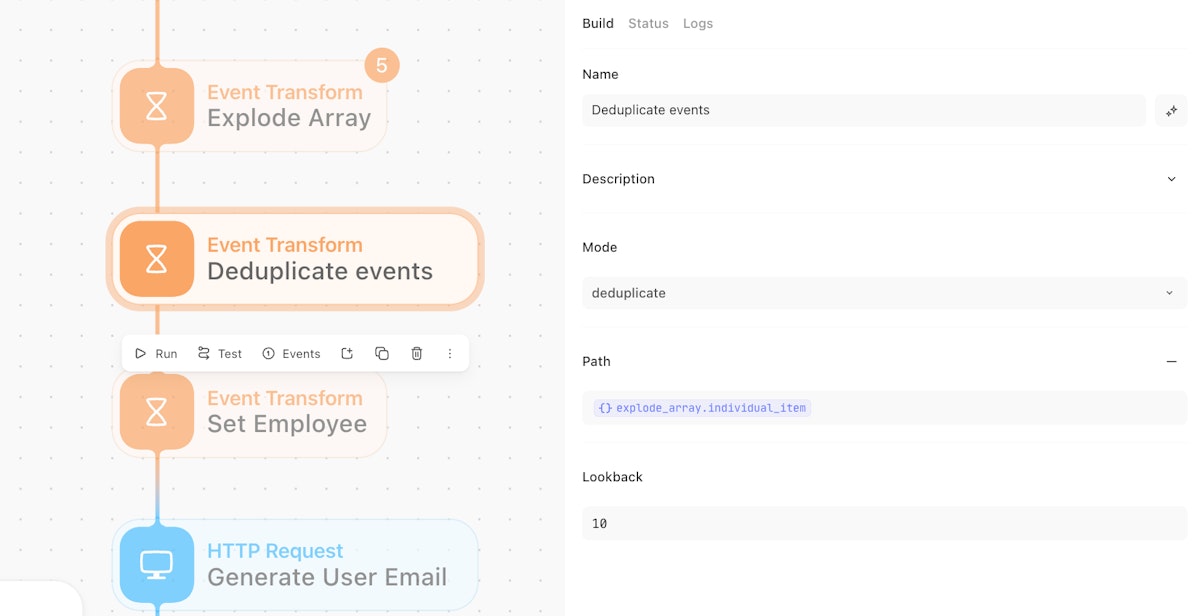
The “Lookback” period in the deduplicate action defines how many past events to inspect for uniqueness. If the incoming event is not unique, it will not be emitted.
You could also set a time period on your deduplicate by clicking the + Option button at the bottom of the configuration pane and selecting “Period”. This means the action will not emit duplicate events within the configured window of time.
💡Note
Configuring Triggers
Depending on which team that an employee is on, the corresponding tool or tools will be provisioned. The triggers already exist, but you will configure them for this story.
Connect the “Successfully added to BambooHR” action to each of the “Team” triggers by dragging the connector arrow to each one.
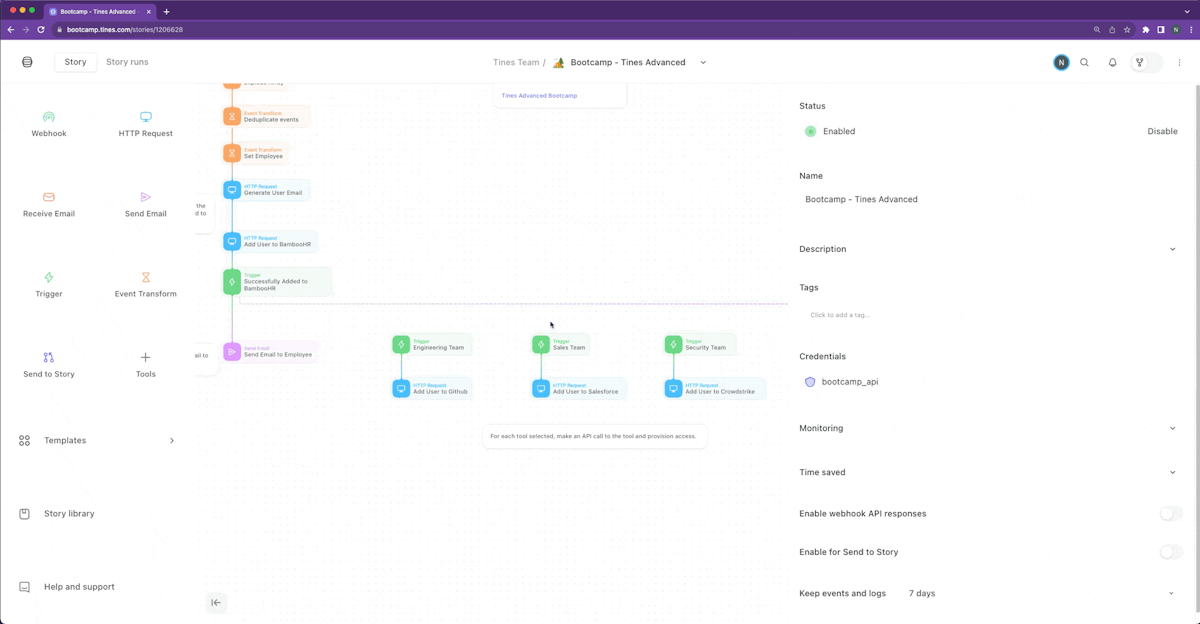
Engineering trigger
Click on the trigger action named “Engineering Team” and click on the somekey.subkey.subkey.goal pill to edit it. Set this path to set_employee.team.
Click on the field currently set to foo and change this value to Engineering.
Your rule should look as follows:

Now this trigger will only emit an event if the employee’s team is equal to Engineering.
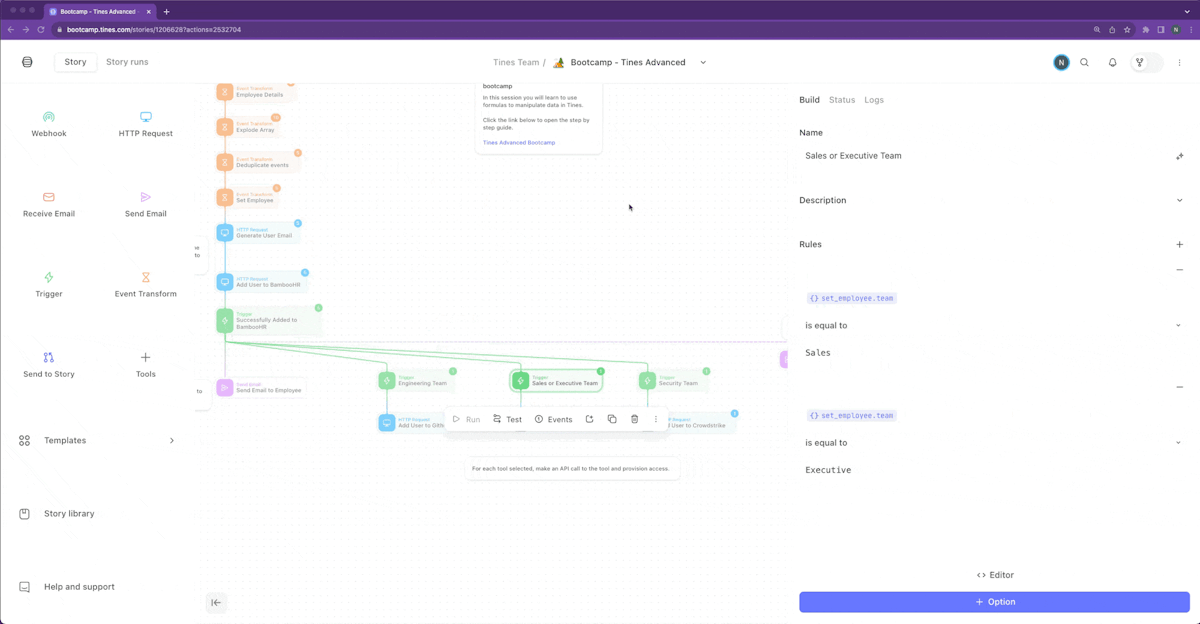
Sales or Executive Trigger
If an employee is on the Sales OR the Executive team, you will want to add them to Salesforce. You can do this by configuring multiple rules on the trigger.
Click the plus sign + to add another rule.
Configure the rules as seen below.
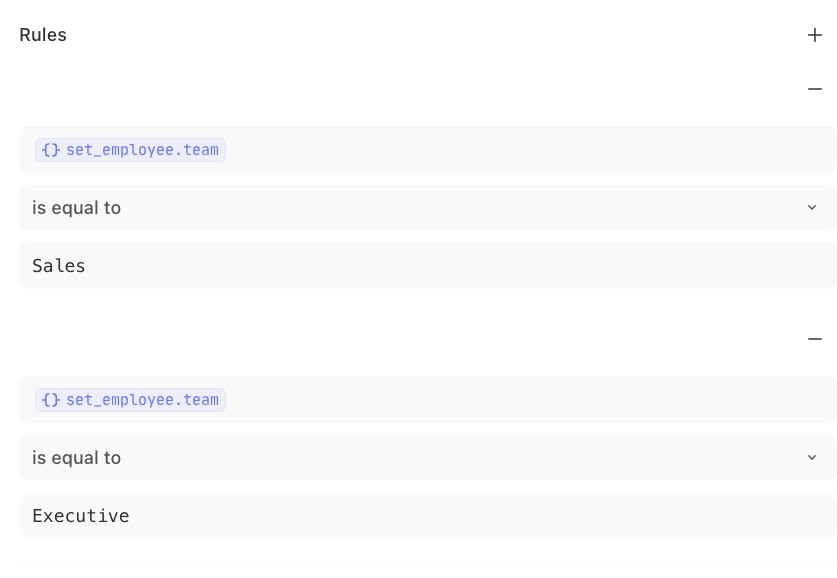
By default, rules are set to an AND configuration, meaning all rules must be true for the trigger to emit an event.
You can change this to an OR configuration by adding the “Must match” option.
Click on the + Option button at the bottom of the configuration pane and click on “Must Match” to add the option to the action.
Note that the value is set to one by default. This means that if one of the rules in the trigger is true, an event will be emitted.
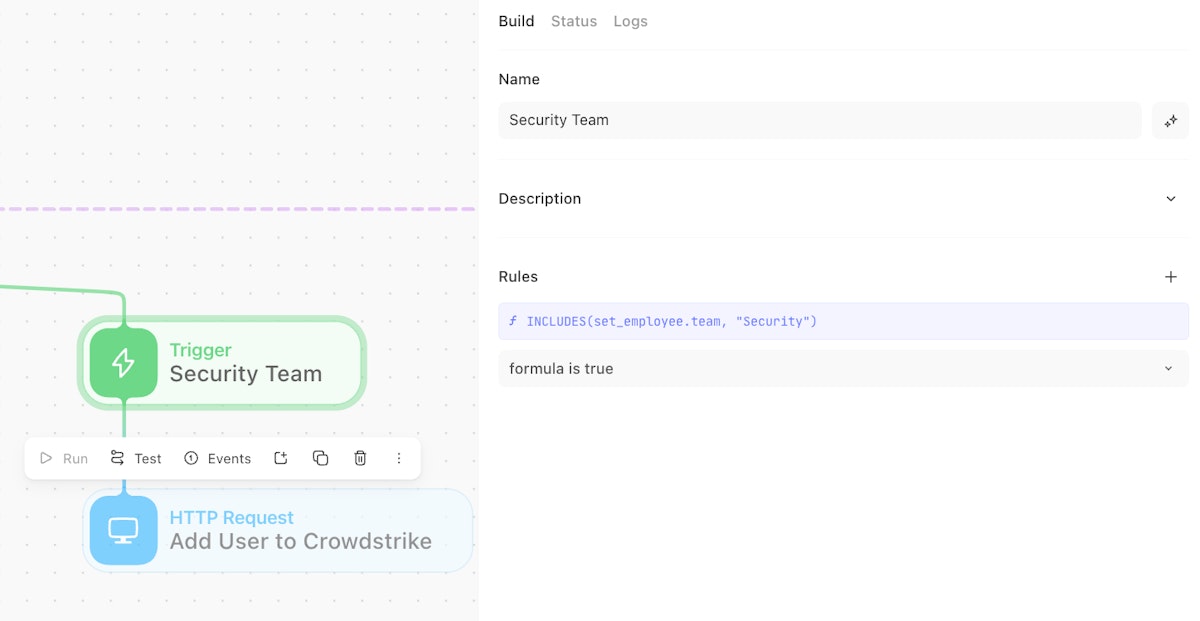
Security trigger
There are many ways to configure triggers to account for a wide range of logical checks for your stories. In this trigger, you will use a function to evaluate the incoming events.
Click on the pill somekey.subkey.subkey.goal to open the pill editor. Replace the default path with an INCLUDES function. This function examines a target for a defined value, if the value is present in the target, the function returns TRUE.
Set the pill to INCLUDES(set_employee.team, "Security").
Click the drop down that is currently set to “is equal to”. Select “formula is true” from the list.
This trigger will emit an event when the employee team includes the word “Security”.
Run it from the top
Click on the “Get New Employees to Onboard” action at the top of the story. Click “Run” to execute the story and watch the events flow in their proper branches.
If you have been testing, you may notice that events do not flow past your “Deduplicate events” action. If this is the case, you can clear the memory on the action to allow events to flow freely again. Steps for doing so can be found under the “Deduplicating events” section of this guide.
Set a schedule
Every action in Tines can be set to run on a schedule. For this story, you can configure the top action, “Get New Employees to Onboard”, to run every Monday morning at a specific time.
Click the “Get New Employees to Onboard” and go to the “Status” tab in the right pane.
Click on the plus sign + next to “Scheduling” to add a scheduled run. Note that by default the schedule is set to run at 09:00 AM in the tenant’s default time zone.
Click on the schedule to edit the timing. You can change the timezone, set a specific repeating schedule, or using a cron expression if that is more comfortable for you.
Wrap up
Congratulations, and thank you for sticking with us to the end! We went through setting up credentials, using event transform actions, using HTTP requests for multiple API calls, using a trigger action to control the flow of events, consolidating and sending data via email, as well as creating a page so that our users can have a self-service portal for adding new employees.
More importantly, you have seen how easy it can be to automate your most common workflows. We’ve only just scratched the surface of Tines today, as there is so much more that can be done. Take the next step with our advanced bootcamp [link here] to dig even deeper!
More resources
Discover more use cases and prebuilt stories in our Story Library.
Come talk to us on our Community Slack by signing up here.
Check out more of our learning content in the Tines University.
Take the next step and get certified for no cost here.
Want to talk more? You can book a demo with our team on our Pricing Page.