Manually inviting every user to Tines works fine for small teams, but it doesn't scale. Automated user provisioning solves this by creating Tines accounts automatically based on information from your identity provider.
Tines offers two approaches: just-in-time (JIT) provisioning and System for Cross-domain Identity Management (SCIM). Both eliminate manual user management, but they work in different ways.
Just-in-time (JIT) provisioning
JIT provisioning creates a Tines account the first time someone signs in via SSO. You define rules that map groups in your identity provider to teams and roles in Tines. When a new employee signs in for the first time, Tines checks which groups they belong to and filters them to the appropriate Tines teams with the right roles.
Set up JIT
To set up JIT:
Within the Authentication settings, make sure that SSO is enabled via SAML or OIDC.
Enter a value for SSO-group-based access (this is the name of the attribute in your identity provider that contains group information, often just
Group).
Locate the User provisioning section.
Select Just-in-time user provisioning.
Configure your mappings using the Group mapping JSON editor.
Understand JIT configuration
The JIT configuration uses JSON to define how identity provider groups map to Tines teams and roles. Here's what each field means:
group_attribute_name: The name of the attribute in your identity provider that contains group names. This is set via the SSO-group-based access setting.tenant_owners_groups(optional): A list of identity provider groups whose members should be tenant owners.mappings: An array of objects that map identity provider groups to Tines teams and roles.
Each mapping object contains:
group_name: The name of the group in your identity provider.team_name: The name of the Tines team users should join.role_name: The role users should have (i.e., for default team roles:team_admin,editor,viewer,case_manager, orworkbench_user).
❗️Important
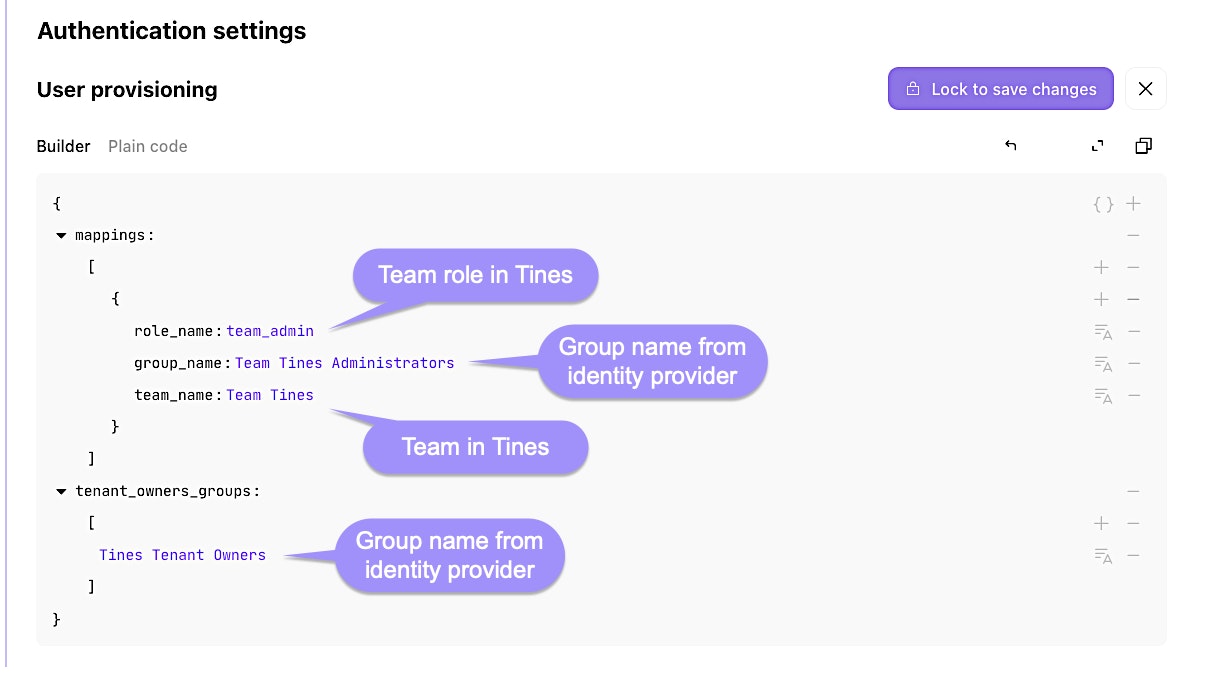
Example of a JIT mapping configuration.
Enhanced JIT syncing
Standard JIT only provisions users on their first sign-in. Enhanced JIT syncing goes further by updating user teams and roles every time they sign in. This keeps Tines in sync with changes in your identity provider.
For example, if someone moves from the marketing team to the sales team in your identity provider, enhanced JIT syncing will automatically update their Tines team membership the next time they sign in.
❗️Important
To enable enhanced JIT syncing, toggle the Enhanced just-in-time syncing switch in the User provisioning section of Authentication settings.
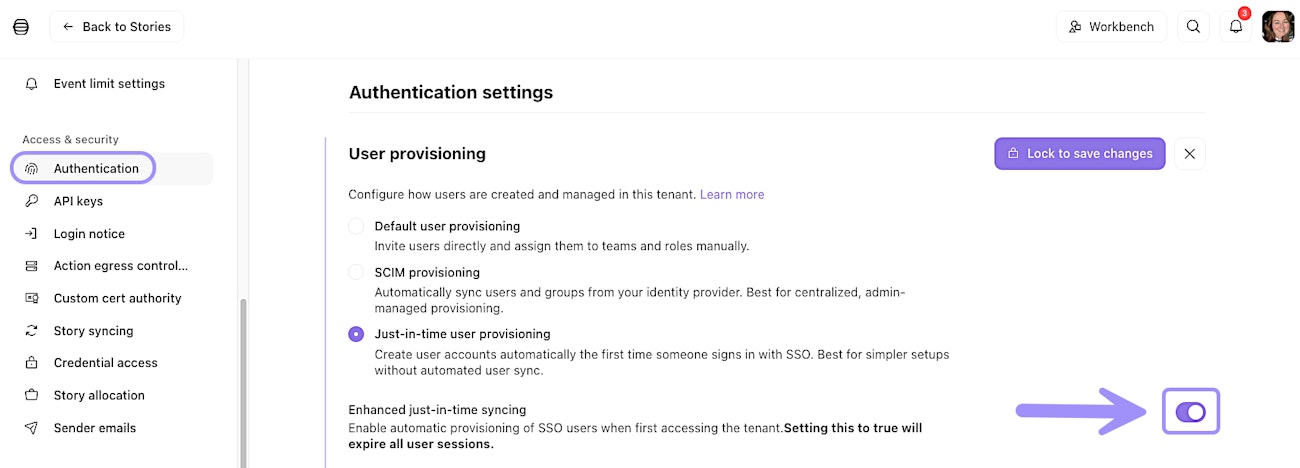
UI location to enable enhanced just-in-time (JIT) syncing.
SCIM provisioning
SCIM (System for Cross-domain Identity Management) is a more robust provisioning protocol. Unlike JIT, which only acts when users sign in, SCIM actively synchronizes users between your identity provider and Tines in real time.
With SCIM, when you create a user in your identity provider, they're immediately created in Tines. When you deactivate a user, they're immediately deactivated in Tines. When you change someone's group membership, their Tines teams update automatically. No sign-in required.
Set up SCIM
To configure SCIM:
Go to Authentication settings and enable SCIM in the User provisioning section.
Generate a tenant-level Tines API key (you'll need this for your identity provider). You can do this via the API keys section within the tenant menu → + New.
In your identity provider, configure a SCIM application with these details:
Base URL:
https://your-tenant.tines.io/api/scim/v2Authorization: Bearer token using your API key
Unique identifier field: userName (must be the user's email)
❗️Important
Map SSO groups to teams and roles
Both JIT and SCIM use group mappings to determine which Tines teams users should join and what roles they should have. You configure these mappings in the Authentication settings using the same JSON format described in the JIT section.