
Introduction
Step one of any automation Story is to get information into Tines. This can be done in several ways, including via a Webhook or polling for alerts. But in many cases, the starting point will be through email.
Phishing response is a very common workflow that security teams want to automate, so it makes sense to have Tines read directly from a mailbox to gather these reports. Similarly, some tools only support alerting to a mailbox; in that case, Tines can help you begin automating by reading and parsing these alerts. As a result, one of the most common questions we get asked is, “How do I connect a mailbox to Tines?” And the answer is: It depends! Here, we’re going to answer this question for Google Workspace (G Suite). But for Microsoft Office 365, this blog will help you get started.
There are a few different authentication methods that can be used to connect Tines to Gmail, and each has its uses and benefits. These are through IMAP, OAuth2, or via a JSON Web Token (JWT). The appropriate auth method will vary depending on your end goal.
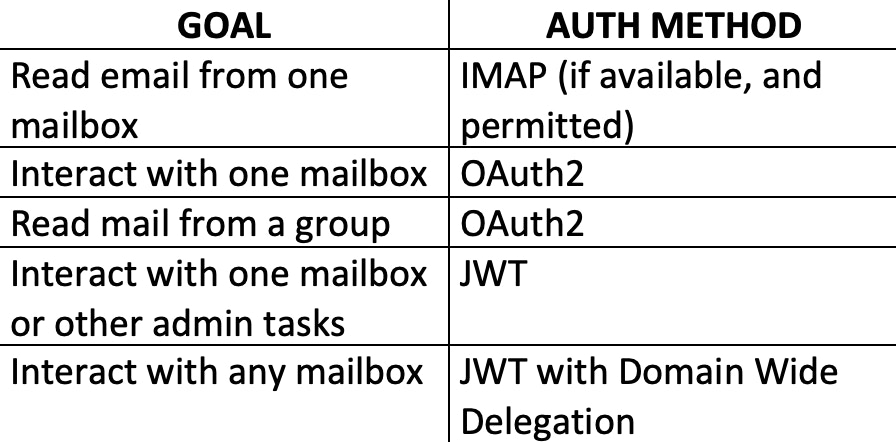
These aren’t strict rules, they're just guidelines to help you set up and read emails in the most straightforward manner possible. Let’s look at the OAuth and JWT authentication in more detail since these require some configuring on the G Suite end.
Getting Started with G Suite APIs
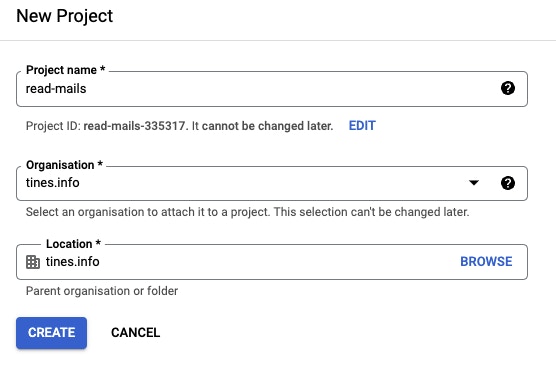
Regardless of whether you need OAuth or JWT auth, the initial steps will be the same and take place in the Google Cloud Console for your organization, where we will create a project. This project will be configured with the permissions and credentials to allow Tines to access the right resources.

First, choose ‘Select a Project’ from the top left bar to get us started. Hit ‘New Project’ from the window that appears, and enter in a name for your project.
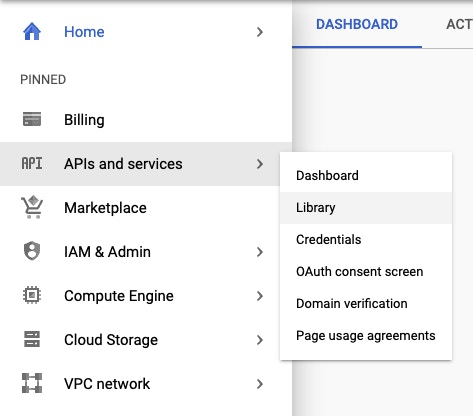
It will take a second for the project to be created, but once it's ready, select it from the 'Select a Project’ drop down. From the left menu, choose 'APIs and Services' and 'Library,' this is where we will select and enable the APIs we want to use.
Within the Library, search for and select Gmail, and hit 'Enable.' Any other necessary APIs can also be enabled here, such as Google Drive.
Next, we need to configure the OAuth Consent Screen. From the left bar, navigate to 'APIs and Services' and 'OAuth Consent Screen.' Select “Internal” for your app user type. On the next page, enter in the required information:
Application Name
User support email
An authorized domain
Developer email address
Select 'Save and Continue' to add scopes to this application.
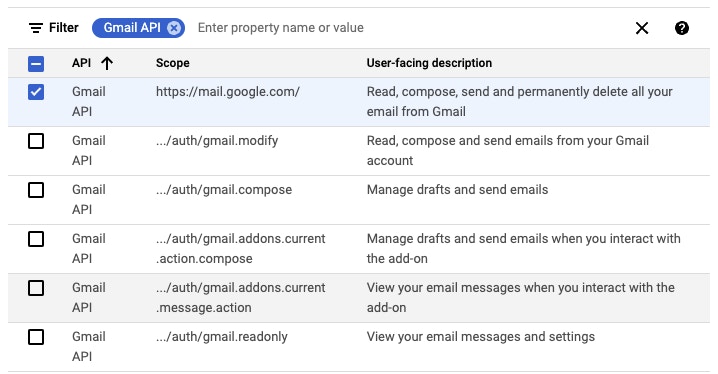
In 'Add or Remove Scopes,' search for Gmail API and enable any scopes you require.
In the screenshot below, the scope ‘http://mail.google.com/’ has been selected. This is the most powerful scope listed and includes all other Gmail permissions. The minimum necessary scopes should be chosen at this point, ‘gmail.readonly’ for example.
Additional scopes for Google Drive or other products should also be added at this point if they will be required. Finally, hit 'Update' to apply these scopes, followed by 'Save and Continue.'
The above actions will need to be carried out regardless of whether OAuth or JWT will be used. Next, we will look specifically at creating an OAuth credential and configuring it in Tines. Following that, JWT authorization will also be examined.
OAuth and G Suite
From the left menu, select 'Credentials' → 'Create Credentials' → 'OAuth Client ID.'
'Application Type' should be set to 'Web Application,' and a name should be entered for this credential.
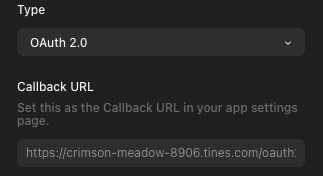
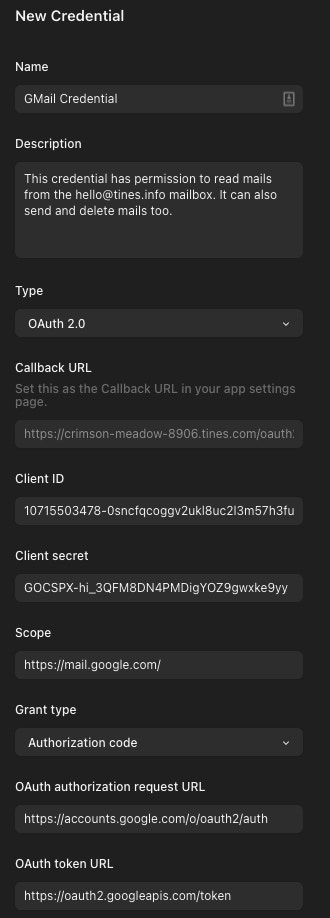
'Authorized Redirect URIs' is an important field when completing the OAuth handshake. To get this value, open your Tines tenant in a new tab, and create a new credential with the type set to OAuth. Copy the Callback URL from the Tines credential window, and paste that into the 'Authorized Redirect URI' field.
Finally, hit 'Create' to generate the OAuth credential. Make a note of the Client ID and Secret that is shown as these won’t be available again.
That is all the configuration needed on the G Suite side. Next, create a new OAuth credential in Tines and fill in the necessary details, including the OAuth Client ID and Secret, a credential name, and any Scopes assigned to the application. A list of the full Scope names can be found here.
Grant Type: Authorization Code
Authorization URL: https://accounts.google.com/o/oauth2/auth
Token URL: https://oauth2.googleapis.com/token
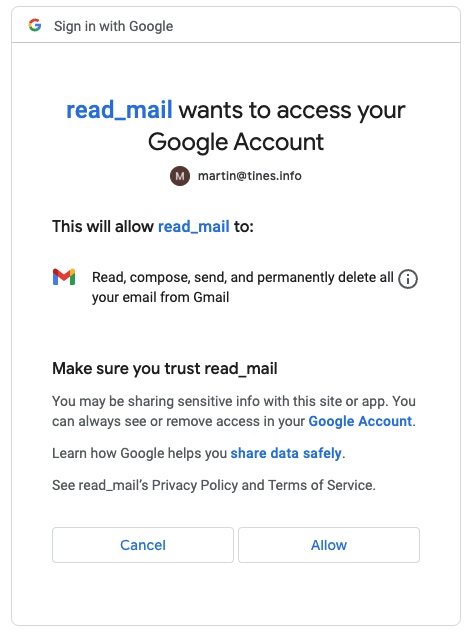
Once 'Save Credential' is selected, Tines will hand off to Google to authorize this application. There, a Google Account will need to be selected, this should be the email account that will be read from Tines, and the permissions that were chosen will need to be approved.
Once access has been approved, the credential should be ready to use, enabling Tines to read email from the chosen mailbox. To make this process easier, Tines has a number of pre-prepared templates for Gmail to help you get started faster. Search for 'Search for Unread Messages in Gmail' in the search bar above the list of ‘Public Templates,’ and drag that onto the Storyboard. You’ll need to modify the URL to point towards your mailbox and possibly the credential name to use the one just created.
JWT and G Suite
From the left menu, select 'Credentials' → 'Create Credentials' → 'Service Account.' Enter a name for this Service Account; this name will also be applied as the ID of the account. Hit 'Create' and 'Continue.'
The next two sections allow you to control how the Service Account is managed. These are not essential, but review the options and add any other users to the account as needed.
When finished, select 'Done' to return to the Credentials List page. Click into the Service Account that was just created, navigate to 'Keys,' and add a new Key. Select JSON for the type, hit 'Create,' and a .json file will be downloaded to your machine. This includes all of the important information needed to use this Service Account, including the Private Key, so this file should be stored securely.
The other step that can be done now is Domain Wide Delegation (DWD). This permits this Service Account to delegate as any user within the organization. More details will be covered a little later in this post.
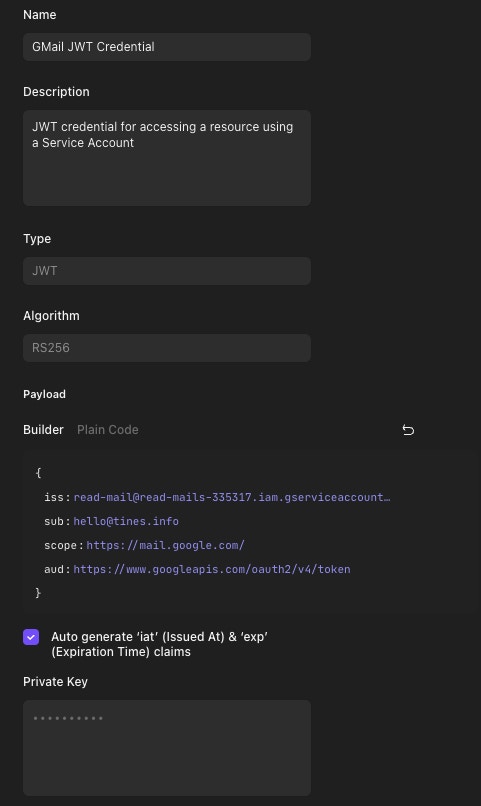
Back in Tines, create a new credential and set the type to JWT. Complete the fields as follows:
ISS: The email of the Service Account. This is the 'client_email' field in the downloaded .json file.
SUB: The subject of the credential. This is the Google account that the Service Account will act as. In this case, it should be the inbox that should be read from. This account will need to be added to the Service Account under the 'Permissions' tab. This field can be left out entirely, in which case action will be taken by the Service Account directly; this can be useful for non-Gmail-related use cases.
Scope: The scope(s) of the resource that should be accessed. This will be the scopes set when initially creating the project. A full list of Scopes can be found here.
AUD: The audience of the credential. This will be the URL that the credential should authenticate against. In this example, “https://www.googleapis.com/oauth2/v4/token” is used.
Tick to select auto-generate Issued At and Expiration Time claims, and copy the entire Private Key into the text field. Hit 'Save' to finish creating this credential.
This credential produces a JWT Token, which must next be used to generate a Bearer Token. To do this, search for the public template ‘Get a Google Bearer token’ within Tines, drag it onto the Storyboard, and update the credential to point towards your newly created JWT credential. When run, this will return a Bearer Token that can be passed to a Tines Action to read email from the subject’s inbox.
The template ‘Get User Messages in Gmail’ will do this; just update the credential to use the output of ‘Get a Google Bearer Token�’ and insert the subject’s email address in the URL to start reading email.
Domain Wide Delegation
An optional extra step when working with JWT Tokens is to enable Domain Wide Delegation (DWD). This allows the Service Account to delegate as any user in the organization when permitted. Potentially, it can read or delete emails from any mailbox. This should be avoided where possible, but there may be some requirements to enable this, for example, to remove a malicious email from a user’s mailbox.
To do this, a G Suite Admin is required. The admin user should navigate to the G Suite Admin Console and go through 'Security' → 'API Controls' → 'Domain Wide Delegation.' The client ID of the Service Account and the required scopes should be added here and authorized. The Client ID Can be found under the 'Details' tab of the Service Account in the Google Cloud Console.
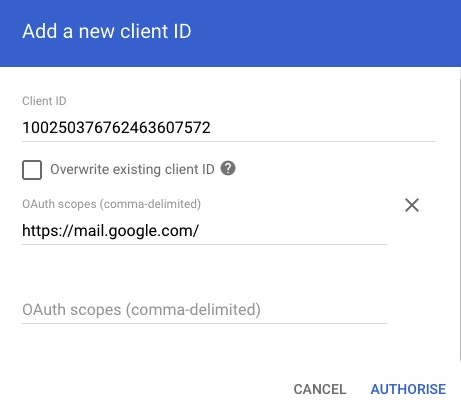
Once authorized, the Service Account can act as any user within the scope(s) outlined by the admin. Using DWD in Tines will work slightly differently; a JWT Token will need to be generated dynamically so that the Service Account can act as any user. A brief Tines Story can be used to handle all of this.
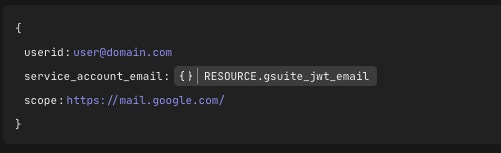
In this Story, Tines dynamically generates and signs a JWT credential and retrieves the Bearer Token, which can be used to access mailboxes or other resources. To work with this Story, create a text credential called “gsuite_private_key” copy in the Private Key from the downloaded .json file.
The Send To Story Action can be used to test this out and shows what fields are expected by the Story.
Conclusion
It goes without saying that Domain Wide Delegation provides a security team with a lot of options, but the trade-off is creating a Service Account with a huge amount of power. And, that’s something that many G Suite admins will not be comfortable with. OAuth is the best and most straightforward way to go for the vast majority of use cases. It should be explored first, and if a JWT Token with Domain Wide Delegation permissions is needed, it should be done in consultation with the G Suite administrators to ensure it is done responsibly.