Security teams are using automation solutions more and more to achieve consistent and faster response times. Some of these responses require emails to be sent to various users or groups, and traditional methods of sending emails are outdated and not very secure. Security teams also need the ability to read emails from specific mailboxes, whether that is for automating responses to phishing submissions or something similar. Security teams should adapt to the changing technologies, and one way to address this issue is by using APIs instead of standard Simple Mail Transfer Protocol (SMTP).
APIs are more secure and provide greater control. Traditional tools may only be able to use their own mail service or make use of service accounts, which are traditionally not secured, to send or read emails. Organizations may not have control over the mail systems that are used to send email, which could leave security teams vulnerable to the configuration of those systems and intercepted messages that contain sensitive information. With incident response teams and threat hunters, for example, the data they send could be information that would lead to other issues, should it be exposed.
Fortunately for these organizations that use Microsoft Office 365, there is a solution to this problem. While this solution is not foolproof, it is more secure than using traditional SMTP to send the mail and allows the organization to control where that message comes from. Using Tines, users can send email from their own Office 365 tenant as their own users, without using service accounts. The steps to achieve this are detailed below, and include permissions to enable reading a mailbox, as that is another common use case that security teams employ.
The first part is to set up Azure Active Directory and include least privileged permissions to restrict what mailboxes can be read or have email sent from.
Steps to send or read email using the Graph API
1: Create a new Azure Active Directory Application Registration
a. Add the following permissions to the application:

i. Type: Application, Name: Mail.Send
ii. Type: Application, Name: Mail.ReadWrite
b. Create a new client secret
2: Create a new user in Azure Active Directory
a. Create either one that is synced to Azure Active Directory from your on-premises Active Directory or just a new Azure Active Directory user (this account will be used to send email as and is not required to be enabled for login)
b. Save the Azure Active Directory Object ID for this user
3: Select the user or shared mailboxes
Select the user or shared mailboxes that you will need read access to and save the Azure Active Directory Object IDs for these users (see New-ApplicationAccessPolicy (ExchangePowerShell) | Microsoft Learn for details on the security principal types allowed)
4: Run PowerShell command
Run the following PowerShell command as an Exchange Admin (see New-ApplicationAccessPolicy (ExchangePowerShell) | Microsoft Learn for details)
a. New-ApplicationAccessPolicy -AccessRight RestrictAccess -AppId "appId-of-aad-app" - PolicyScopeId {objectIds from step two and three} -Description "Restrict Application Registration for sending and reading email"
Regarding the above steps, as some will notice, this grants the ability to send or read all users’ email in the organization. Step four mitigates this risk as it restricts the Azure Active Directory Application Registration to only the mailboxes that are specified in that policy.
For the API to send messages, if any files (including images) are needed in the email you will need to base64 encode the contents of the file to use them in the API call.
Back in Tines, there are a few steps required to make all this work:
1: Create a new Credential with the following values:
a. Name: any identifiable name
b. Description: any identifiable description
c. Callback URL: autofilled
d. Client ID: Azure Active Directory Application Registration AppId
e. Client Secret: Azure Active Directory Application Registration Client Secret
f. Scope: https://graph.microsoft.com/.default
g. Oauth Provider: Manual
h. Grant Type: Client Credentials
i. Oauth Token URL: "https://login.microsoftonline.com/{aad tenant id}/oauth2/v2.0/token”
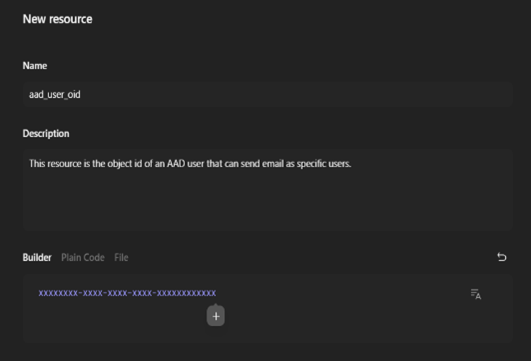
2: Create a new resource:
a. Name: any identifiable name
b. Description: any identifiable description
c. Builder: {objectId of SendAs account from step two above}

3: Create a new resource for each mailbox:
Create a new resource for each mailbox to read from, with similar settings as above, but change out the objectId to the user(s) you will need to read mail from.
4: Select a new HTTP Request Action in the Story to send emails:
On the Story to send emails, select a new HTTP Request Action with the following values:
a. URL: https://graph.microsoft.com/v1.0/users/<<RESOURCE.name>>/sendMail - change the .name to the name of the resource created in step two here
b. Content Type: JSON
c. Method: post
d. Headers:
Authorization: Bearer <<CREDENTIAL.appcred>> (use the Tines Credential you created in step one above)
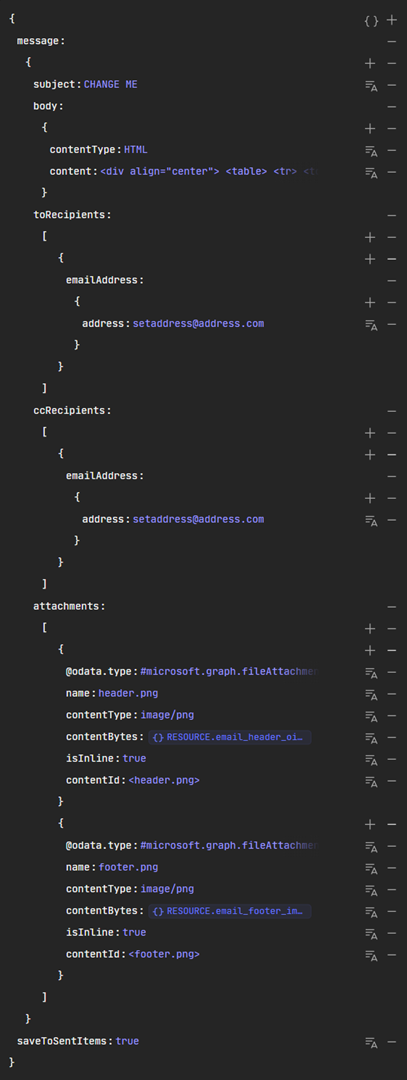
e. Builder: (any text in “CHANGE ME” should be changed. If Header and Footer are not required, then the attachments section and the info for them in “content” should be removed. To find all the values that can be used, please reference message resource type - Microsoft Graph v1.0 | Microsoft Learn

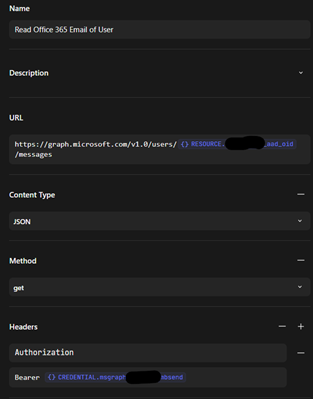
5: Select a new HTTP Request Action in the Story to read emails:
On the Story to read emails, select a new HTTP Request Action with the following values:
a. URL: https://graph.microsoft.com/v1.0/users/<<RESOURCE.name>>/messages - change the .name to the name of the Resource to read email from
b. Method: get
c. Headers:
Authorization: Bearer <<CREDENTIAL.appcred>> (use the Tines Credential you created in step one above)

Now that everything is set up in Azure Active Directory, Exchange Online, and Tines, this Action can be used to send email messages as an account in your own Office365 environment – which you control, and the message starts as an API call instead of a SMTP method.
In the future, if you are using Microsoft Information Protection, you will be able to send this message as encrypted, however, the functionality is not available at this time. The steps above also show an example of how to use Tines to read email from a mailbox that resides in Office365 using the Graph API.
With the help of some initial configuration in Azure AD, Exchange Online, and the power of Tines, security teams can now send email and read email using the Graph API in a secure manner that doesn't expose data outside of their tenant. This allows the teams to take control of where emails are sent from, the content in those messages and also restrict which mailboxes these actions can occur in. In the security world, least privilege is a common theme, and with this setup, it can be achieved.