

Today's business world is more complex than ever, and many companies are reliant on private networks to keep their data safe and secure. But what happens when you need to access data from a remote location or connect to multiple separate private environments? In this guide, we'll show you how to create a Tines Tunnel so you can route traffic from Tines to a private API/network successfully. Read on for step-by-step instructions.
This blog assumes you are using an AWS Amazon Linux EC2 instance to run Docker in AWS. However, this can be done with any host that can run Docker and is connected to the private network you need to route to. Tines documentation can also be found here.
Step 1: Ask Tines support to provide a Tunnel for your tenant. Once provisioned, the information for the later steps will be provided here: https://<tenant-domain>/admin/tunnel.
Step 2: Launch an EC2 instance with the Amazon Linux AMI. Ensure the instance is launched in the same network/VPC that is connected to the private API/service you want your Tines Actions to connect to.
After launching the instance and SSHin’g in https://docs.aws.amazon.com/AWSEC2/latest/UserGuide/launching-instance.html https://docs.aws.amazon.com/AWSEC2/latest/UserGuide/AccessingInstancesLinux.html, run the following commands so that you can install and execute Docker commands on the instance.
Step 3: Install Docker on the Instance
Update the packages on your instance
[ec2-user ~]$ sudo yum update -yInstall Docker
[ec2-user ~]$ sudo yum install docker -yStart the Docker Service
[ec2-user ~]$ sudo service docker startAdd the ec2-user to the docker group so you can execute Docker commands without using sudo
[ec2-user ~]$ sudo usermod -a -G docker ec2-userSECURITY NOTE - When creating the Security Group you can use the default SG that AWS provisions, which allows all outbound traffic to ensure that the Tunnel will work correctly (no inbound traffic is required for the Tunnel to function). However, to make it more secure, we recommend that you restrict the outgoing traffic via the Security Group or ACL to only the following destinations/ports, which are required because Tines uses Cloudflare Tunnels.
Step 4: Run the following Docker command once Docker is up and running (get the secret from the /admin/tunnel location on your tenant).
[ec2-user ~]$ sudo docker run \
  --env TINES_TUNNEL_SECRET="secret" \
  tines/tines-tunnel:latest
Note, if you want this to run in the background, you can add a -d flag to the above command.
Once running, you should now be able to create an HTTP Request Action that uses the Tunnel within your tenant.
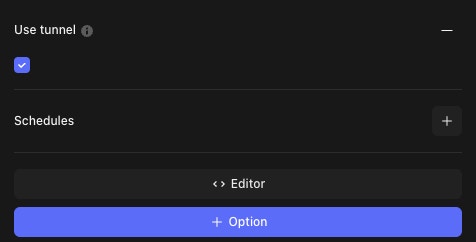
Step 5: In order to create an HTTP Request Action in your tenant, first drag the HTTP Request Action onto your Storyboard. Click on the Action and then click on the + Option on the right side of the builder for the Action and select 'USE TUNNEL.' Ensure the button is checked, and this should then route the HTTP Request Action through the Tunnel that you have set up.

Troubleshooting:
If you receive a Tines error saying, “We couldn’t establish a tunneled connection. Check whether your Tines Tunnel container is running properly,” check to ensure that the docker command ran successfully without errors on your EC2 instance, and also check that it is still running. Running the command in the background (-d) is advised for long-running sessions.
If you receive a Tines error saying “Net::OpenTimeout,” ensure the firewall allows the required outbound network communication to communicate with the Cloudflare Tunnels.