Now that you understand your role as a tenant owner, let's talk about where much of your work will take place. All of your administrative controls live in the Settings area of Tines.
Access tenant Settings
Getting to your tenant owner settings is straightforward:
Within your tenant, navigate to the team menu (top-left corner of the user interface (UI)).
Select Settings from the dropdown menu.
You're now in the central hub for all tenant-level configuration.
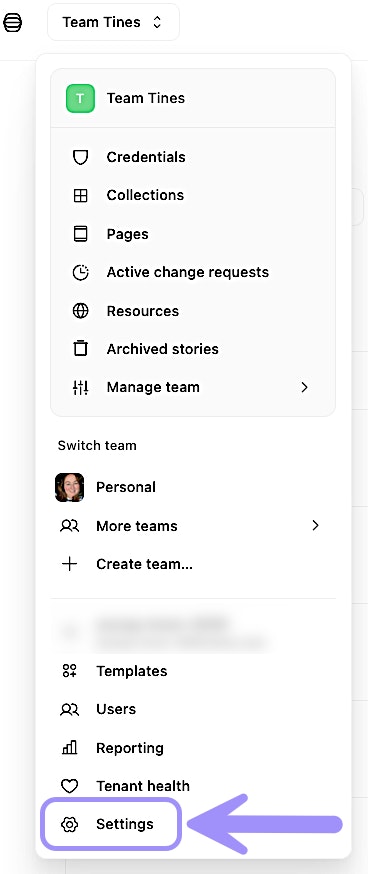
UI location of the tenant Settings.
Your admin control center
Once you're in the Settings menu, you'll notice the interface is organized into four main categories. Let's walk through each one so you know where to find what you need.
❗️Important
Tenant
This section contains your most frequently accessed settings (this section will be headed by your tenant domain):
Users: This is where you'll manage who has access to your tenant. You can invite new users, assign roles, adjust access levels, and organize people into teams. Think of this as your user directory.
Roles: Create and manage custom roles with specific permissions tailored to your organization's needs. Custom roles allow you to define granular access controls beyond the standard team roles.
Credentials: This gives you a bird's-eye view of all credentials connected across your tenant. You can search through them, control which teams can access specific credentials, filter by usage or domain restriction, and delete credentials that are no longer needed. (Note: you can't create new credentials from this view, only manage existing ones.)
Page access: This shows you all the pages created in Tines across your tenant. You can preview them, view them in their associated workflows, and customize settings.
Custom Runtimes: Configure custom runtime environments for executing code in your workflows. This allows you to define specialized execution environments when the default options don't meet your requirements.
Billing: View and manage your subscription, usage, and payment details for your Tines tenant (available for cloud tenants).
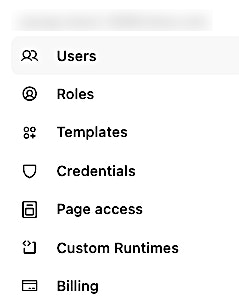
UI view of the Tenant menu options.
Configurations
This section is all about how your tenant behaves:
Action settings: Configure default behaviors for actions across your environment. This includes settings for code execution, pages, and MCP servers.
AI settings: Manage how AI capabilities work within Tines. You'll control access to AI agents, configure which models to use, and set usage parameters.
Change control: Implement governance for workflow modifications. This is where you enable draft and approval processes to prevent unauthorized changes to production workflows.
Feature flags: Toggle experimental or optional capabilities on or off. This gives you control over new features and beta functionality as provided by the Tines team.
Event limit settings: Manage the maximum number of events your tenant can process. You can set threshold alerts and add notification recipients.

UI view of the Configurations menu options.
Access & security
This is where you'll configure how people access your tenant and what security controls are in place:
Authentication: Configure how users log in. This includes setting up single sign-on (SSO), managing session timeouts, and configuring user provisioning.
API keys: Create, rotate, and revoke API keys that allow external systems to interact with your Tines instance.
Login notice: Customize messages displayed to users during login (useful for compliance notifications or important announcements).
Command over HTTP: Configure the command-over-http service that allows your Tines tenant to make programmatic calls to systems running on your private network, which may not have HTTP interfaces.
Tunnel: Manage tunnel containers that enable secure connections between Tines and resources on your private network. HTTP requests can be sent through tunnels to access internal systems.
Action egress control rules: Configure allowlists to restrict where HTTP Request Actions can send data. Control outbound connections by specifying approved IP addresses or domains.
Custom cert authority: Upload custom CA certificates for connections with internal systems using self-signed certificates.
Story syncing: Set up automatic synchronization of stories to destination teams or tenants. When changes are published to the live version of synced stories, they're automatically updated in all configured destinations.
Credential access: Manage how credentials can be accessed and used across your tenant. This is where you configure domain restrictions and credential usage policies.
Story allocation: Manage the number of stories each team can create.
Sender emails: Add custom email addresses for notifications sent from Tines.
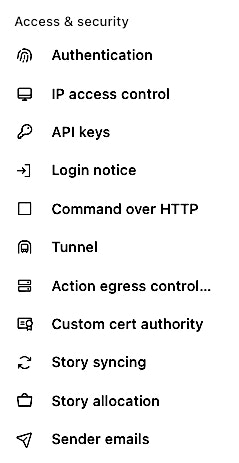
UI view of the Access & security menu options.
Monitoring
This section helps you keep tabs on what's happening in your tenant:
Audit logs: Review a comprehensive history of activities within your environment. This is essential for security monitoring, compliance reporting, and troubleshooting.
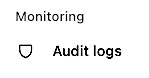
UI view of the Monitoring menu options.