

💡Note
If your organization leverages Office 365, Microsoft Graph provides programmatic access to a wealth of data that can be used to better inform decision-making during threat detection and response. In this post, we explore how to enable Tines for Microsoft Graph security automation. So that you can use information such as Outlook emails, organizational structure, advanced threat analytics, and more in your security automation program.
Step 1 – Getting an app ID and secret for use in Microsoft Graph
Authenticating for Microsoft Graph security automation
We will authenticate to Microsoft Graph using an app ID and secret. To get these, we need to register a new application in the Microsoft Azure App Registrations Portal. Sign in with your Microsoft credentials. Note, you will need to be working with an administrator of your Microsoft account.
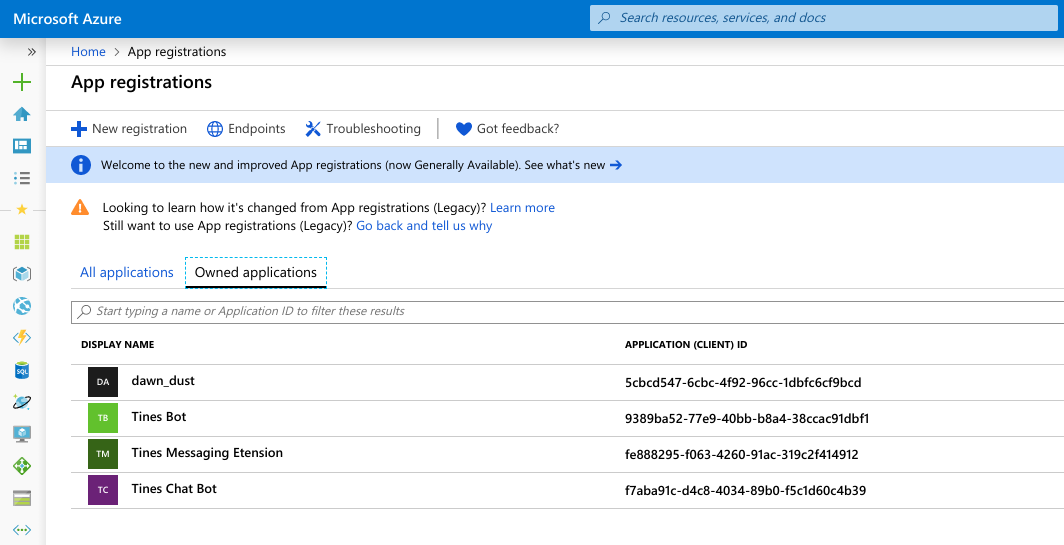
Click “New Registration.”
Enter an application name and select “Accounts in this organizational directory only (yourorganization.com)”.
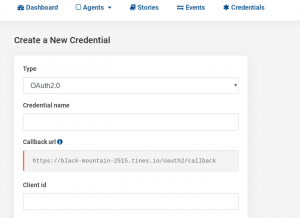
Then enter your callback URL. You can find your callback url in your Tines tenant by creating a new OAuth 2.0 credential. We’ll return to this page in Tines shortly.
Now click “Register.”
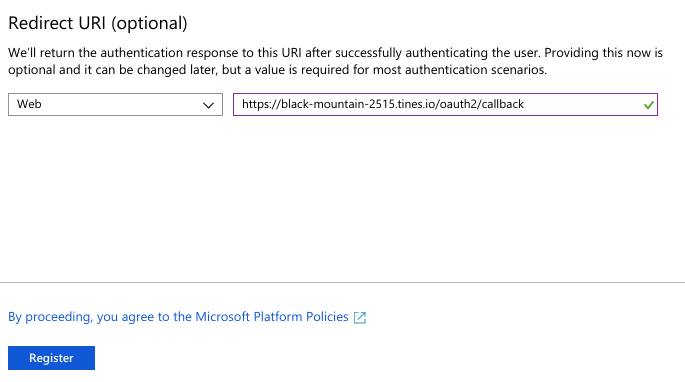
You should be redirected to a page like this:

Now create a new application secret using the “Certificates and Secrets” tab.
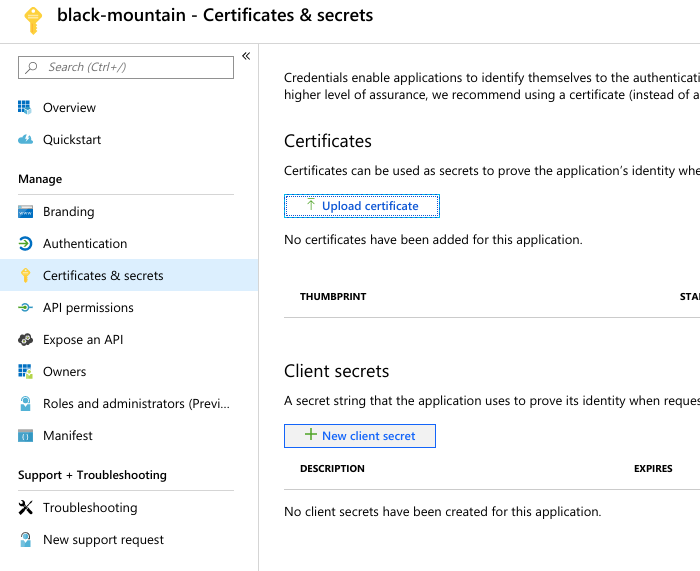
Take note of the generated secret (you only see it once) and the application ID, we will need these when creating a Tines credential later.
Step 2 – Selecting Scopes
Finally, we need to define the permissions this application should have, this is also referred to as the OAuth2.0 scopes. Permissions include everything from creating tasks to sending emails. A full list of permissions is available in the Microsoft Graph docs.
It is best security practice to provide the application with the minimum amount of permissions necessary to perform its required task(s).
In our example, we want to read Outlook emails using Tines, so we’ll include the Mail.readpermission. To view and edit permissions go to the API Permissions Tab, click “Add a permission” select “Microsoft Graph” and then “Delegated Permissions”. Choose the relevant permissions, including “offline_access” and click “Add Permissions.”
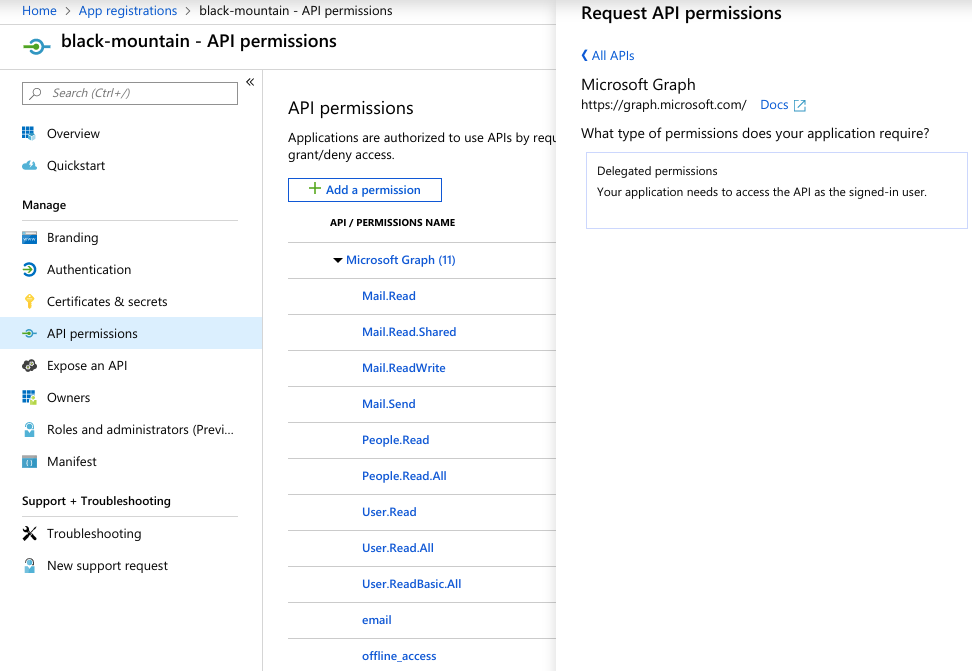
You may need to click “Grant Consent” as an administrator for some or all permissions.

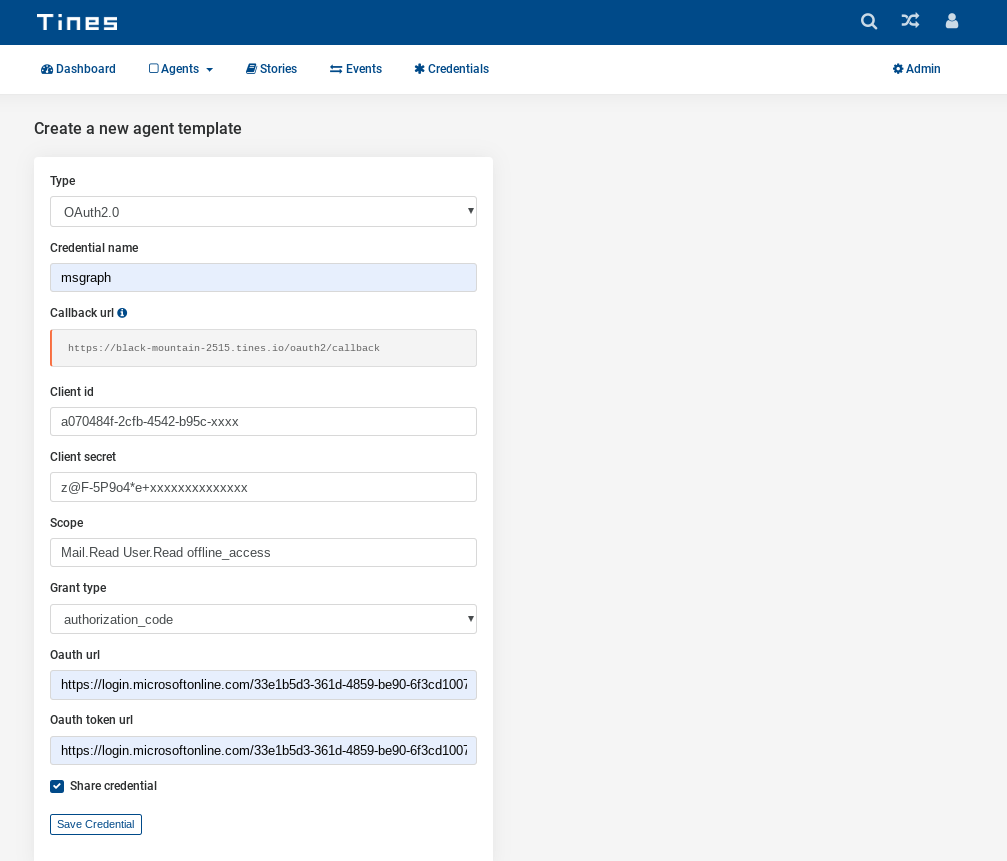
Step 3 – Adding Details to a Tines credential
Next, we now need to add these details to the Tines credential so they correspond with the application we’ve just registered. We will use this credential in our Actions to access Microsoft Graph security data. From your Tines tenant, choose “Credentials” and “New Credential”. From the “Type” dropdown, choose OAuth2.0. Give your credential a name, I used “msgraph”, but you can use whatever makes sense in your situation.
Under “client ID” and “client secret” in the “Create credential” page, enter the “application id” and “application secret” from the application you just registered in Step 1.
Copy the Client/Application ID and return to the New Credential page and copy the Secret from the Client Secrets you just created.
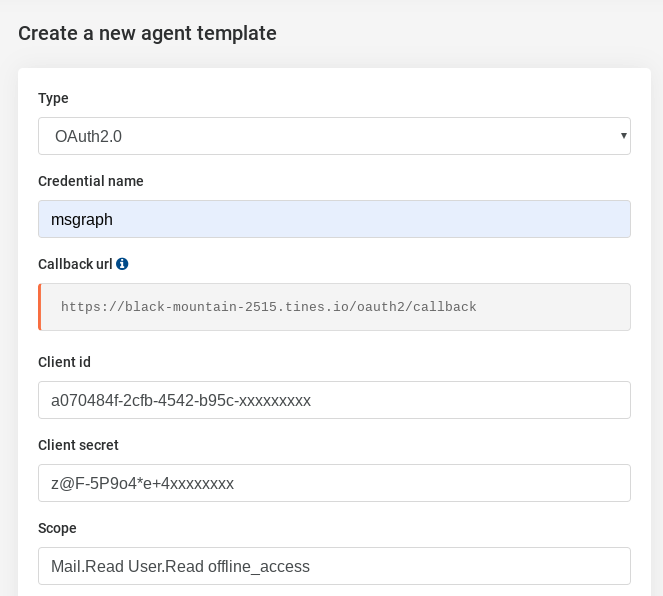
Under scope, we’ll enter a space-separated list of the permissions we used when registering the Graph application in Step 2. That is: Mail.read and User.read. Additionally, we will include the offline_access scope. This scope will allow Tines to request fresh access tokens as necessary.
From the “Grant type” dropdown, choose “authorization_code”.
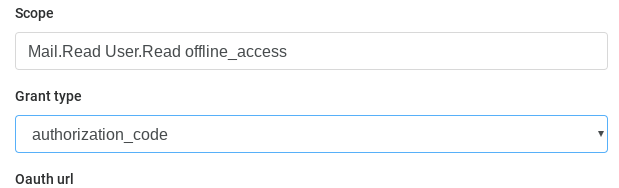
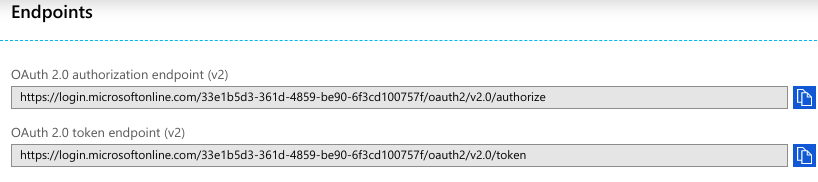
Under “Oauth url” and “Oauth token url”, we need to tell Tines where to request authorization and access tokens.
You can find these under "Overview" > "Endpoints"
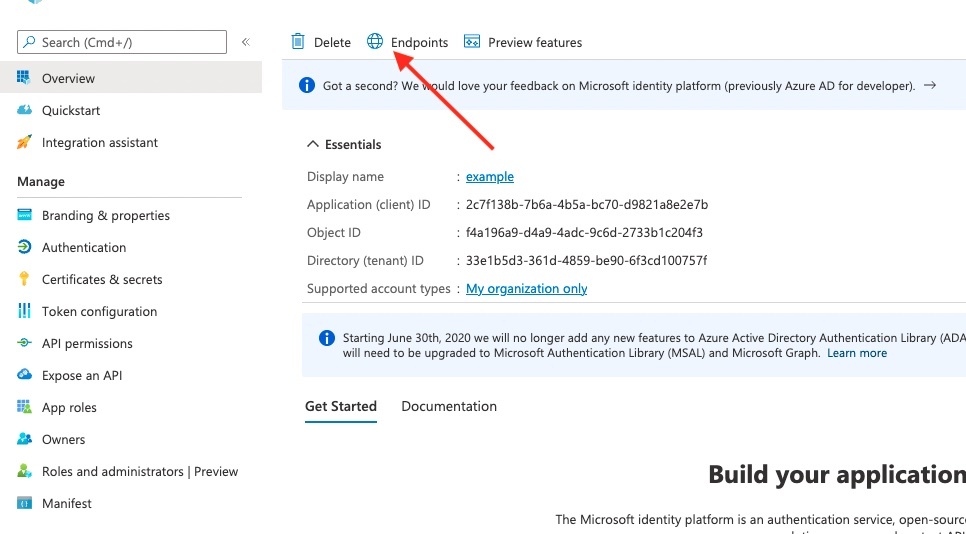
In our example, we have chosen the v2 endpoints.
Having entered all the required information into the “Create credential” page, it should look similar to the one below. You can optionally choose to share the credential.
When you select “Save credential”, Tines will redirect to a Microsoft account consent page, where you will be asked to authorize the application’s access to your account.
After accepting the request, Microsoft will securely redirect you to Tines.
Step 4 – Creating a Tines Action
We now have everything we need to connect Tines and Microsoft Graph. So, we’ll now use a standard Tines HTTP Request Action to read emails from an Outlook account.
Graph Explorer is a very useful tool for understanding how to interact with the data in Graph. Using Graph Explorer, we can read Microsoft Graph security data. In addition, we can see that in order to read Outlook messages, we need to send a GET request to the following URL:
https://graph.microsoft.com/v1.0/me/messagesAs such, we will create an HTTP Request with the following Options block:
{
  "url": "https://graph.microsoft.com/v1.0/me/messages",
  "method": "get",
  "headers": {
    "Authorization": "Bearer {% credential msgraph %}"
  }
}
Consequently, when this Action runs, Tines will replace the credential widget ({% credential msgraph %}) with a valid access token. The event emitted by this Action will contain emails from my Outlook inbox. For example:
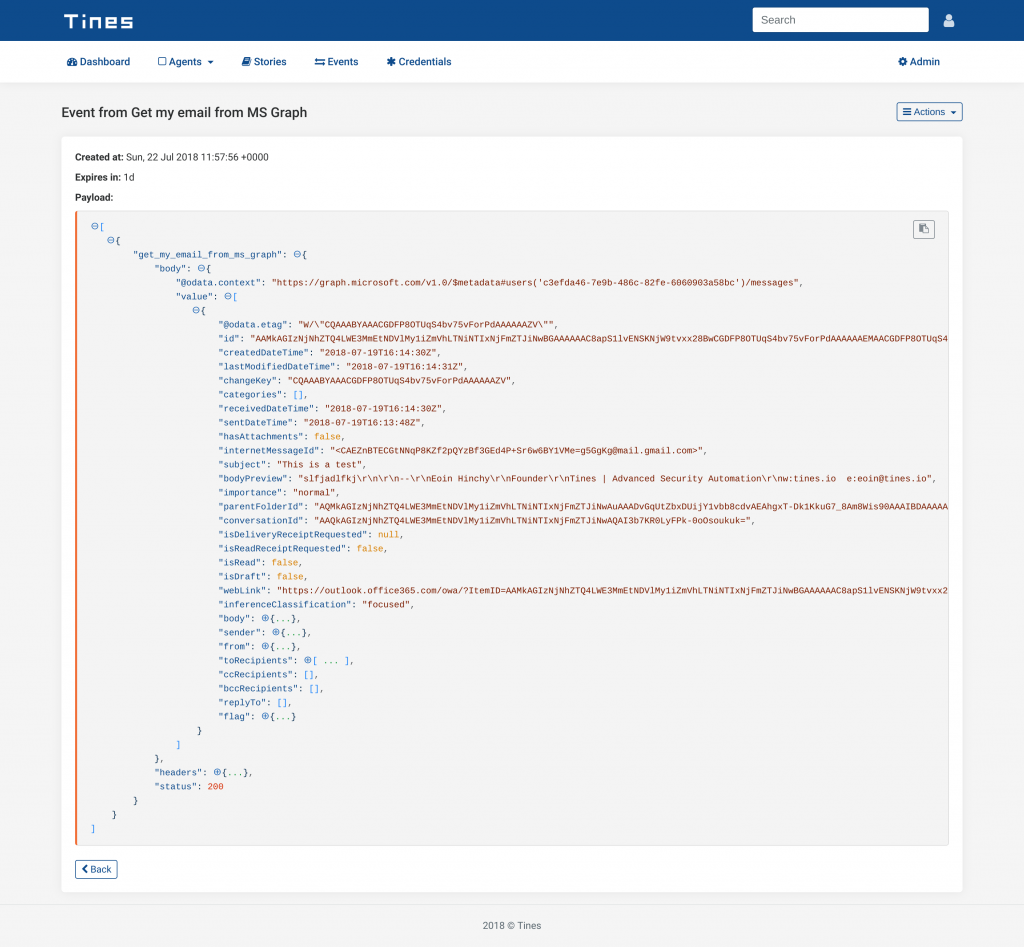
Tines - Event generated by Microsoft Graph Security Automation
Summary
In conclusion, Microsoft Graph exposes an extraordinarily rich repository of data and capabilities. By using the Tines advanced security automation platform to automate interaction with Graph, security analysts can automate their Microsoft Graph security tasks, and perform more thorough threat detection and response. Of course, all while simultaneously freeing up analyst resources and allowing them to refocus on higher-impact activities.
References
Microsoft Graph quickstart guide: https://developer.microsoft.com/en-us/graph/quick-start
*Please note we recently updated our terminology. Our "agents" are now known as "Actions," but some visuals might not reflect this.*