


Responding to security alerts and notifications can be time-critical. Fortunately, advanced tools like Splunk, Microsoft Graph, GSuite, SumoLogic, Jira and more allow notifications or alerts to be sent to webhooks. Using a webhook Action in the Tines Security Automation platform, it is simple to receive and process these alerts instantly. Subscribing to notifications in MS Graph can save you time and allow your team to respond to a threat or notification the instant it is generated.
For many tools, subscribing to notifications can be done through the UI. However, other tools like Microsoft Graph require you to validate the subscription using OAuth and renew the subscription periodically. In this tutorial, we'll demonstrate how to subscribe to notifications in Microsoft Graph.
What notifications are available?
Microsoft Graph subscriptions are available on over a dozen tools, including the below resources:
Azure Security Center
Microsoft ATP
Microsoft Cloud App Security
Office 365
Azure Sentinel
Group Changes
File uploads or modifications in OneDrive for Business
Active Directory Updates e.g., changes to a user profile
Sharepoint Lists
Contacts
In an earlier blog, we configured an O365 application to interact with the Graph API to process phishing emails. To do this, Tines polls the API and checks for new emails in a mailbox every five minutes, for example. Instead of waiting five minutes between calls, however, we can implement the Subscription change notification function to receive email notifications from O365 in real-time via a Tines webhook.
Note, for this tutorial, you’ll need a preconfigured Azure Application with Delegated Mail.Read, offline_access permissions and an o365 OAuth Credential in your Tines tenant. The steps to set up this application and credential are outlined in this blog.
Step 1: Create a webhook
The first step to receiving alerts is to create a valid webhook. During the subscription creation process, o365 will send a Validation Token to this webhook. For a webhook to be valid for subscriptions, it will require a response that fulfills three requirements:
An HTTP Status 200 response code
A Content-Type of `text/plain`
A body containing the validationToken provided by the initial Graph request
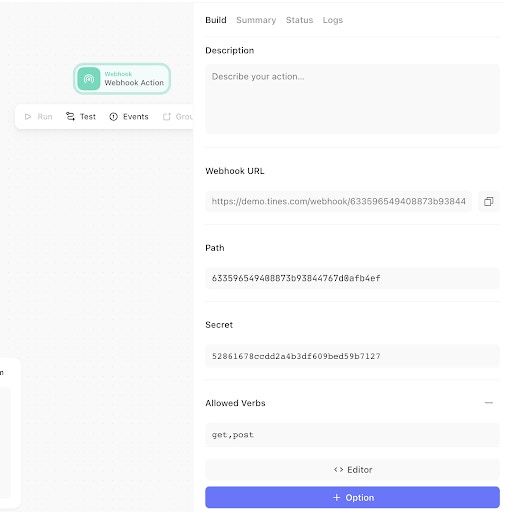
To do this in Tines, first, create a new Story, then drag a Webhook Action onto the Storyboard. This Action will receive new email notifications directly from o365. We then add a dynamic response of the Validation Token. The below Webhook Action configuration will satisfy each of the above requirements:
{
"secret": "e95ad9f65e17208e9a02b93066ece17f",
"verbs": "get,post",
"response_code": "200",
"response": "{{.validationToken}}"
}Step 2: Create a subscription
To create a subscription, we need to make a post request to the subscriptions endpoint with the resource we are subscribing to and our webhook URL. In curl, the request would look like this:
curl --request POST --url https://graph.microsoft.com/v1.0/subscriptions -H 'authorization: Bearer $password' -H 'content-type: application/json' --data '{"changeType":"created","notificationUrl":"https://your-webhook-url.com","resource":"/me/mailfolders('\''inbox'\'')/messages","expirationDateTime":"2020-05-05T00:00:00","clientState": "SecretClientState"}'In Tines, we can use an HTTP Request Action to create the subscription. This Action configuration will submit a request to the Microsoft Graph API. Using the resource '/me/mailfolders('inbox')/messages' we are registering a subscription to all new emails in the inbox of the Azure Application owner.
{
"url": "https://graph.microsoft.com/v1.0/subscriptions",
"content_type": "json",
"method": "post",
"payload":
	{ "changeType": "created",
  	"notificationUrl": "https://spring-wildflower-6327.tines.io/webhook/9bcde94f6d3d0194b6c396b29dc59b61/e95ad9f65e17208e9a02b93066ece17f",
    "resource": "/me/mailfolders('inbox')/messages",
    "expirationDateTime": "{{ "now" | date: "%s" | plus: 240000 | date: "%Y-%m-%dT%H:%M:%S.%H%M%d0Z" }}",
    "clientState": "SecretClientState"
    },
"headers": {
	"Authorization": "Bearer {{CREDENTIAL.msgraph }}" } }
Microsoft Graph Subscriptions for new email notifications are only valid for a maximum of 4,230 minutes (slightly less than three days), and the expiration date and time are needed as part of the request. To calculate the expiration Date/Time, we use a Liquid Tag to get the current time and parse it to seconds. The next 240000 seconds are added to the time before it is parsed into the timestamp format required by Graph. This timestamp will be in UTC.
Testing the subscription
The notification URL in this Action configuration is the destination of the Webhook Action we created earlier. This URL can be found in the “Summary” tab of the Webhook Action.
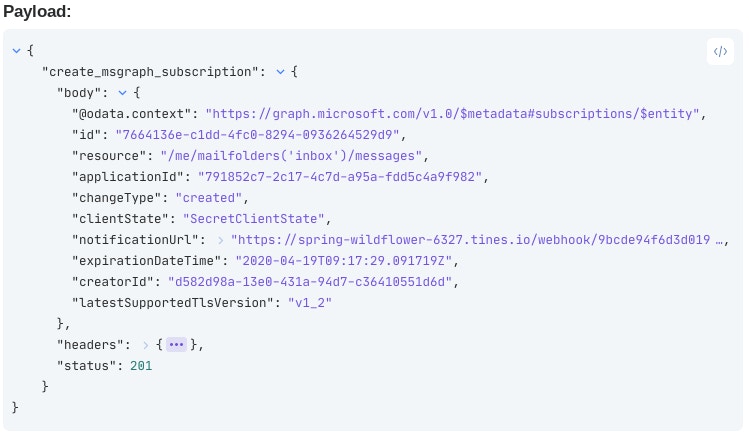
Now that the initial configuration is complete, we can run the HTTP Request Action. This sends our subscription request to the Graph API. The Graph API will send a request to the “notificationUrl“ webhook, and the webhook will respond with the required validationToken. If it is valid, it will authenticate the subscription to Graph and respond with 'changeType':'created'.
Step 3: Auto-renew the subscription
The subscription we’ve just created will be valid for less than three days, after which it will expire unless renewed. Renewing is straightforward, though. In curl, the request would look like:
curl --request PATCH --url https://graph.microsoft.com/v1.0/subscriptions/7664135e-c1dd-4fc0-8794-0936264529d9 -H 'authorization: Bearer $password' -H 'content-type: application/json' --data '{"expirationDateTime":"2020-05-08T00:00:00"}'In Tines, we’re going to use an HTTP Request Action and the HTTP ‘patch’ method to update the expirationDateTime of the subscription.
Using the same Liquid filter used earlier, we generate a new expiration date.
{
"url": "https://graph.microsoft.com/v1.0/subscriptions/7664136e-c1dd-4fc0-8294-0936264529d9",
"content_type": "json",
"method": "patch",
"payload": {
"expirationDateTime": "{{ "now" | date: "%s" | plus: 240000 | date: "%Y-%m-%dT%H:%M:%S.%H%M%d0Z" }}"
},
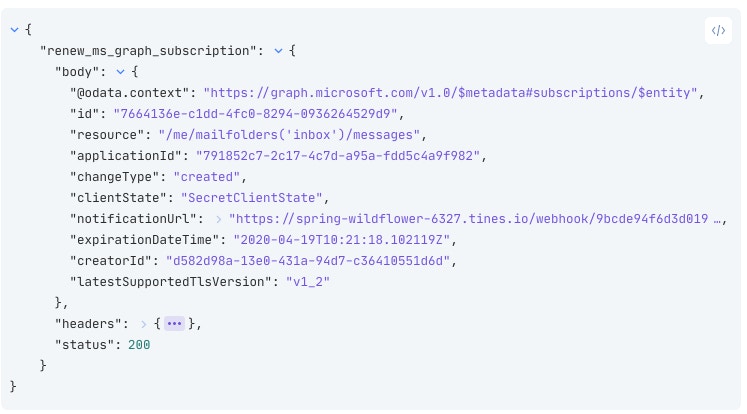
"headers": {
"Authorization": "Bearer {{ credential.msgraph }}" } }Graph will respond with an HTTP Status 200 and a body confirming the subscription details.
To ensure the mail alerts keep coming into the webhook, we should schedule this HTTP Request Action to run daily to renew the subscription. If you're in Tines, congratulations, you've now subscribed to new emails! You can use this process to subscribe to other notifications like security alerts, calendar invites, File Uploads, Active Directory Changes, and more. Subscribing to Notifications in MS Graph is just one part of the automation process, however. We are not quite finished building our Story!
Step 4: Process emails coming into the webhook
The next time a mail arrives in our chosen inbox, Microsoft will send a notification to the Webhook Action. The notification will look like this:
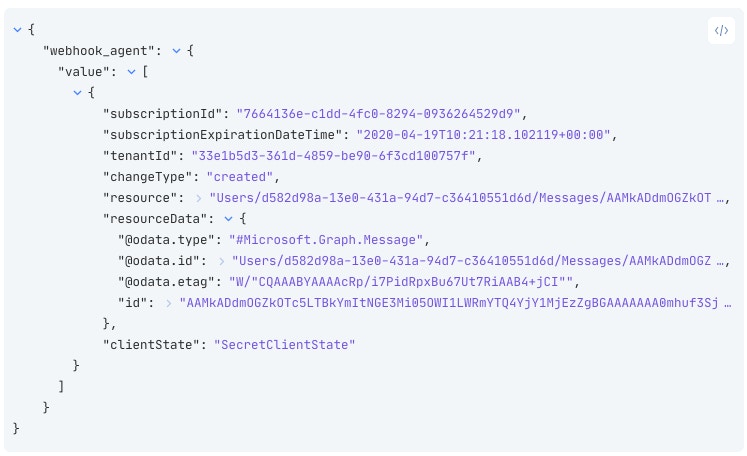
It doesn’t look like an email just yet, but we’re nearly there! The important value in this event is the "id" field, which is a direct pointer to the mail that just arrived. First, we’re going to explode the "value" array into its individual elements. In the above example, there is only one element in the array, however, it is possible two emails may arrive at the same time, and be dispatched in the same notification. This is especially important if you’re interested in changes as well as creations - like creating and updating a calendar event, or processing security alerts, for example.
An Event Transformation Action in “Explode” mode will take each element in an array, and emit each one as a new event.
 {
"mode": "explode",
"path": "{{.webhook_agent.value}}",
"to": "individual_notification"
}
Retrieving individual events
The last step to getting a basic Story up and running is to use the ID from the earlier event and get the content of the message. In curl we would take the ID from the subscription and make the following request:
curl --request GET --url https://graph.microsoft.com/v1.0/me/messages/$ID -H 'authorization: Bearer $password' -H 'content-type: application/json'In Tines, will need another HTTP Request Action using the below configuration to get the content.
{
"url": "https://graph.microsoft.com/v1.0/me/messages/{{.explode_graph_notification_array.individual_notification.resourceData.id}}",
"content_type": "json",
"method": "get",
"headers": {
"Authorization": "Bearer {{credential. msgraph }}" } }
When that Action receives an event from the previous explode Action, it will use the message ID field to download a JSON formatted email.
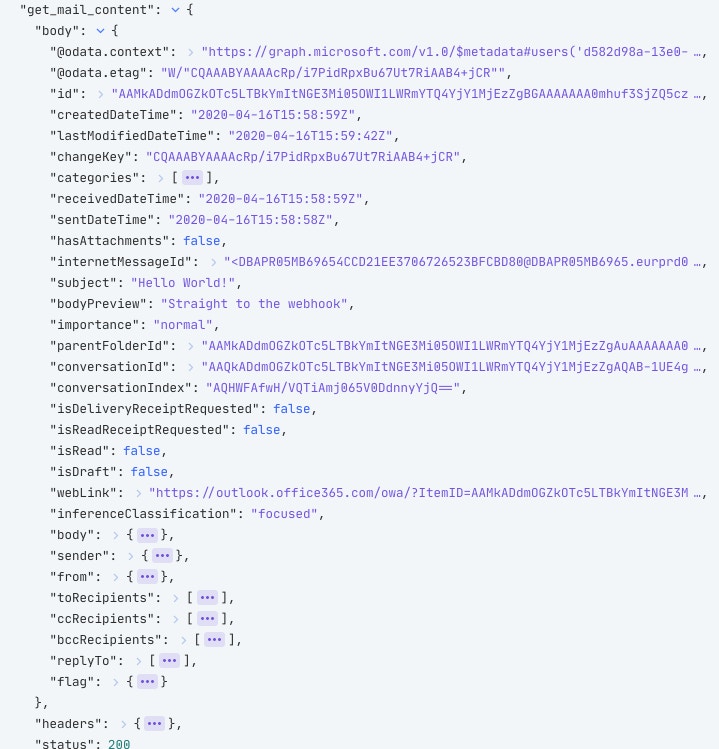
At the end of this, we have a short Tines Story to receive new email notifications, get the email content, and renew the subscription every day. We do not need the Create Subscription Action now that everything is set up and working, so we can delete this Action.
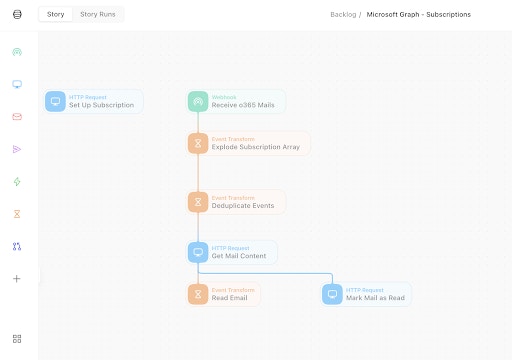
From this point, we could go on to create a case in a case management system, send a notification to Slack, extract and scan URLs from the mail, or automate the other manual steps security analysts will carry out when investigating an email. You can download this Story here.
Reference
https://docs.microsoft.com/en-us/graph/webhooks#notification-endpoint-validation
Summary
Subscribing to Notifications in MS Graph API allows us to build on existing foundations to improve efficiency and simplicity. These are just the first couple of steps towards automating an entire process and reclaiming analyst time to allow them to focus on high-priority incidents.